
How to Secure AI Agent Internet Access with Control D
Step-by-step: limit what each AI agent can reach online with DNS policies, block DNS exfiltration, and log every lookup with Control D.

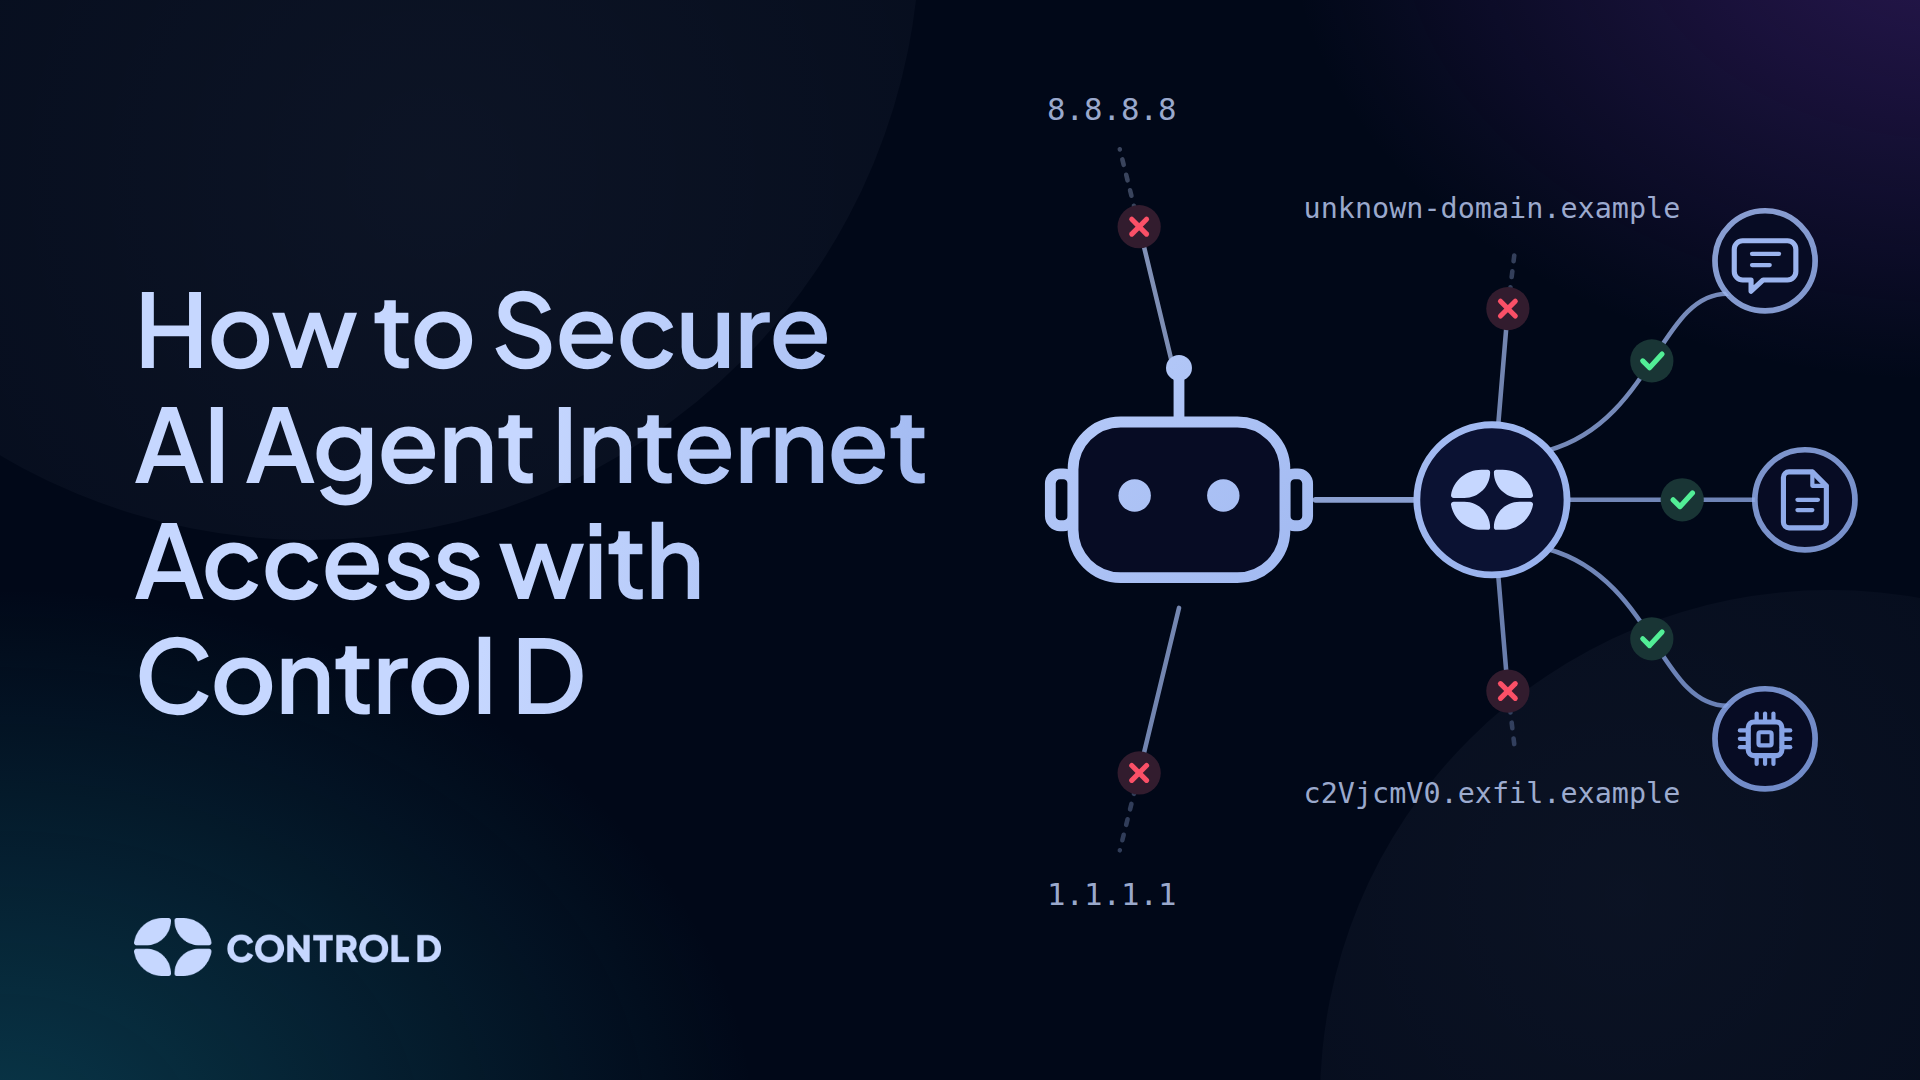
Most AI agents can look up any domain on the internet, and nothing outside the agent limits which ones they can reach. This guide shows you how to set those limits with Control D.
By the end, each agent will only reach the domains its job needs, every lookup will be logged against it, and the most common DNS exfiltration techniques will be blocked. It's the same setup we run on our own internal bots.
Securing AI agent internet access with Control D takes eight steps, starting with the Profiles that hold each agent's rules.
Step 1: Create Your Profiles
A Profile is a set of rules that Control D applies to a machine. You'll create two kinds:
- An All Agents Profile with the protections every agent needs
- An agent-specific Profile for each type of agent, such as your support agents or coding agents.
Each agent uses both at once, so you only need to maintain shared protections in one place.
Create the All Agents Profile
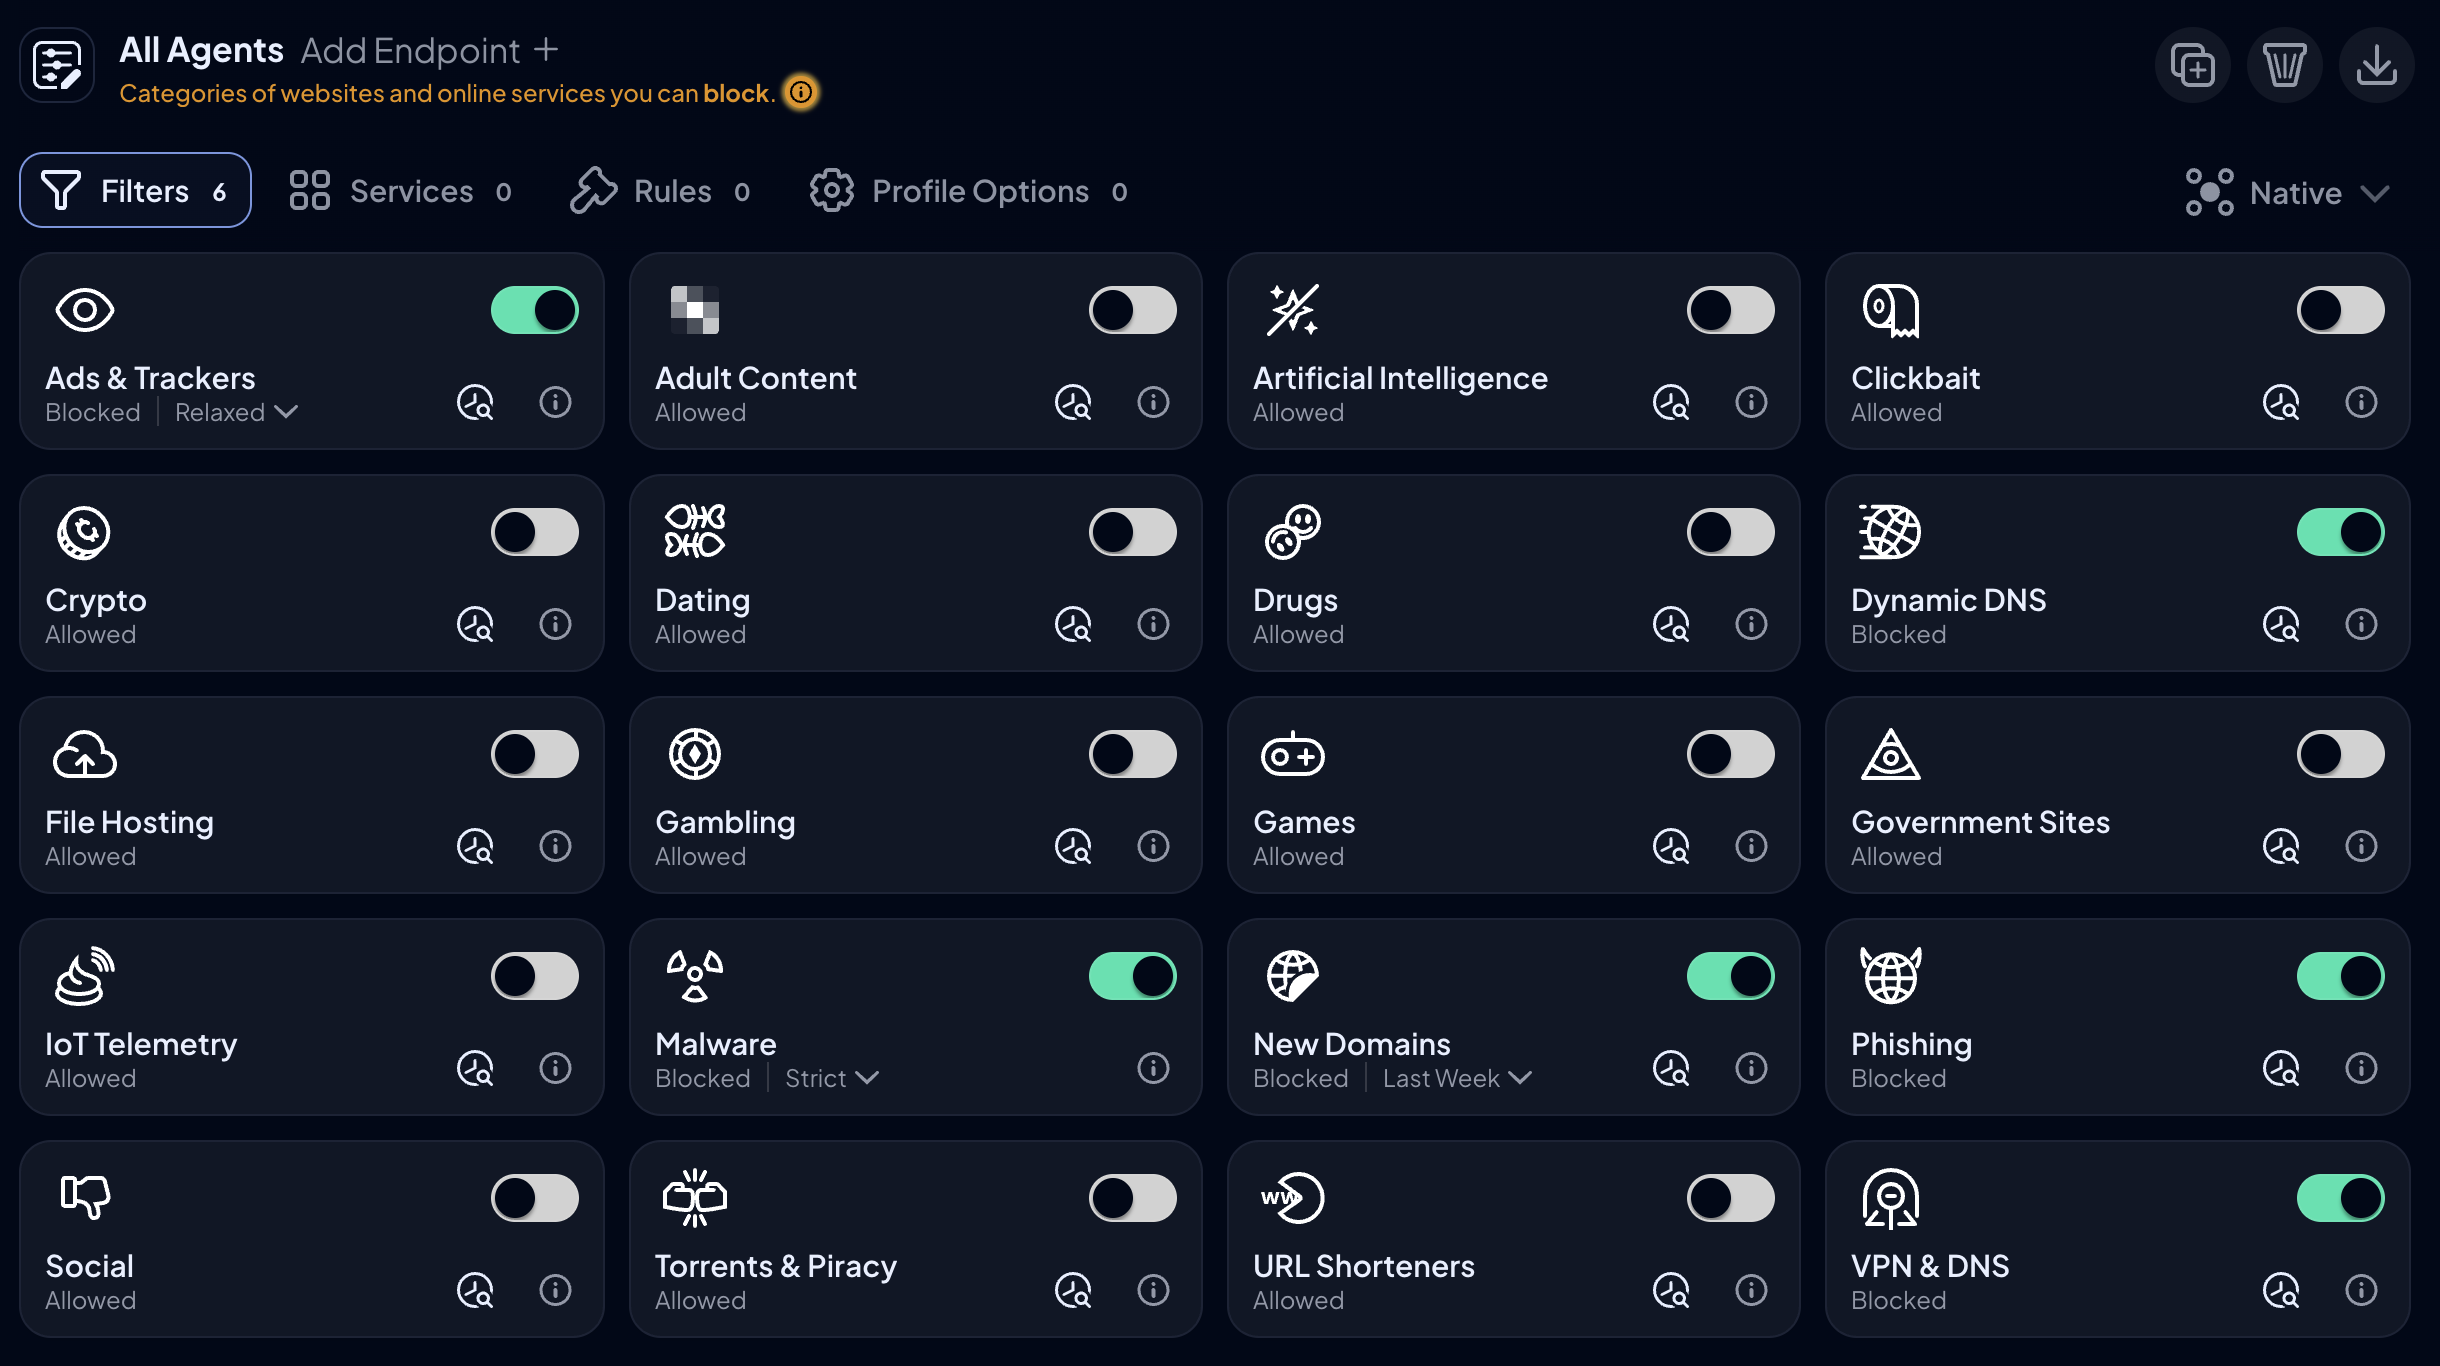
- Create a Profile called "All Agents."
- We recommend turning on these Filters:
- Malware, set to Strict. This also turns on the AI Malware Filter at Minimal in this Profile.
- Phishing, to block look-alike and typo domains.
- Ads & Trackers, to cut tracking and advertising domains out of agent traffic.
- New Domains, since attackers often register fresh domains.
- Dynamic DNS, which covers wildcard IP services such as sslip.io and nip.io.
- VPN & DNS, which blocks major DNS and VPN providers by name, plus some well-known DNS tunneling services.
- Block Cloudflare Tunnel, VS Code Tunnel, and Ngrok Services, which cover tunneling domains. Attackers often use these addresses to receive stolen data.
Create an Agent-Specific Profile for Each Type of Agent
- Create a Profile for each type of agent, such as "Support Agents" or "Coding Agents."
- Leave its Default Rule on Bypass, so anything the All Agents Profile doesn't block still resolves while you learn what each agent uses. You'll tighten it in Step 6.
- Turn on Block DNS Exfiltration only in agent-specific Profiles, never in the All Agents Profile (see Step 7). That way each agent's own setting applies, whichever order its Profiles are in.
Step 2: Install ctrld Where Your Agents Run
ctrld is our lightweight, open-source daemon client. It runs as a system service and sends every DNS lookup on the machine to Control D, so each agent needs its own machine or VM, or must sit behind a ctrld gateway.
Agents hosted on a vendor's platform can't run ctrld, so use that platform's network settings instead. The steps below use Linux, but ctrld follows the same flow on Windows and macOS.
Choose the setup that matches how your agents are deployed.
One Agent on Its Own Machine
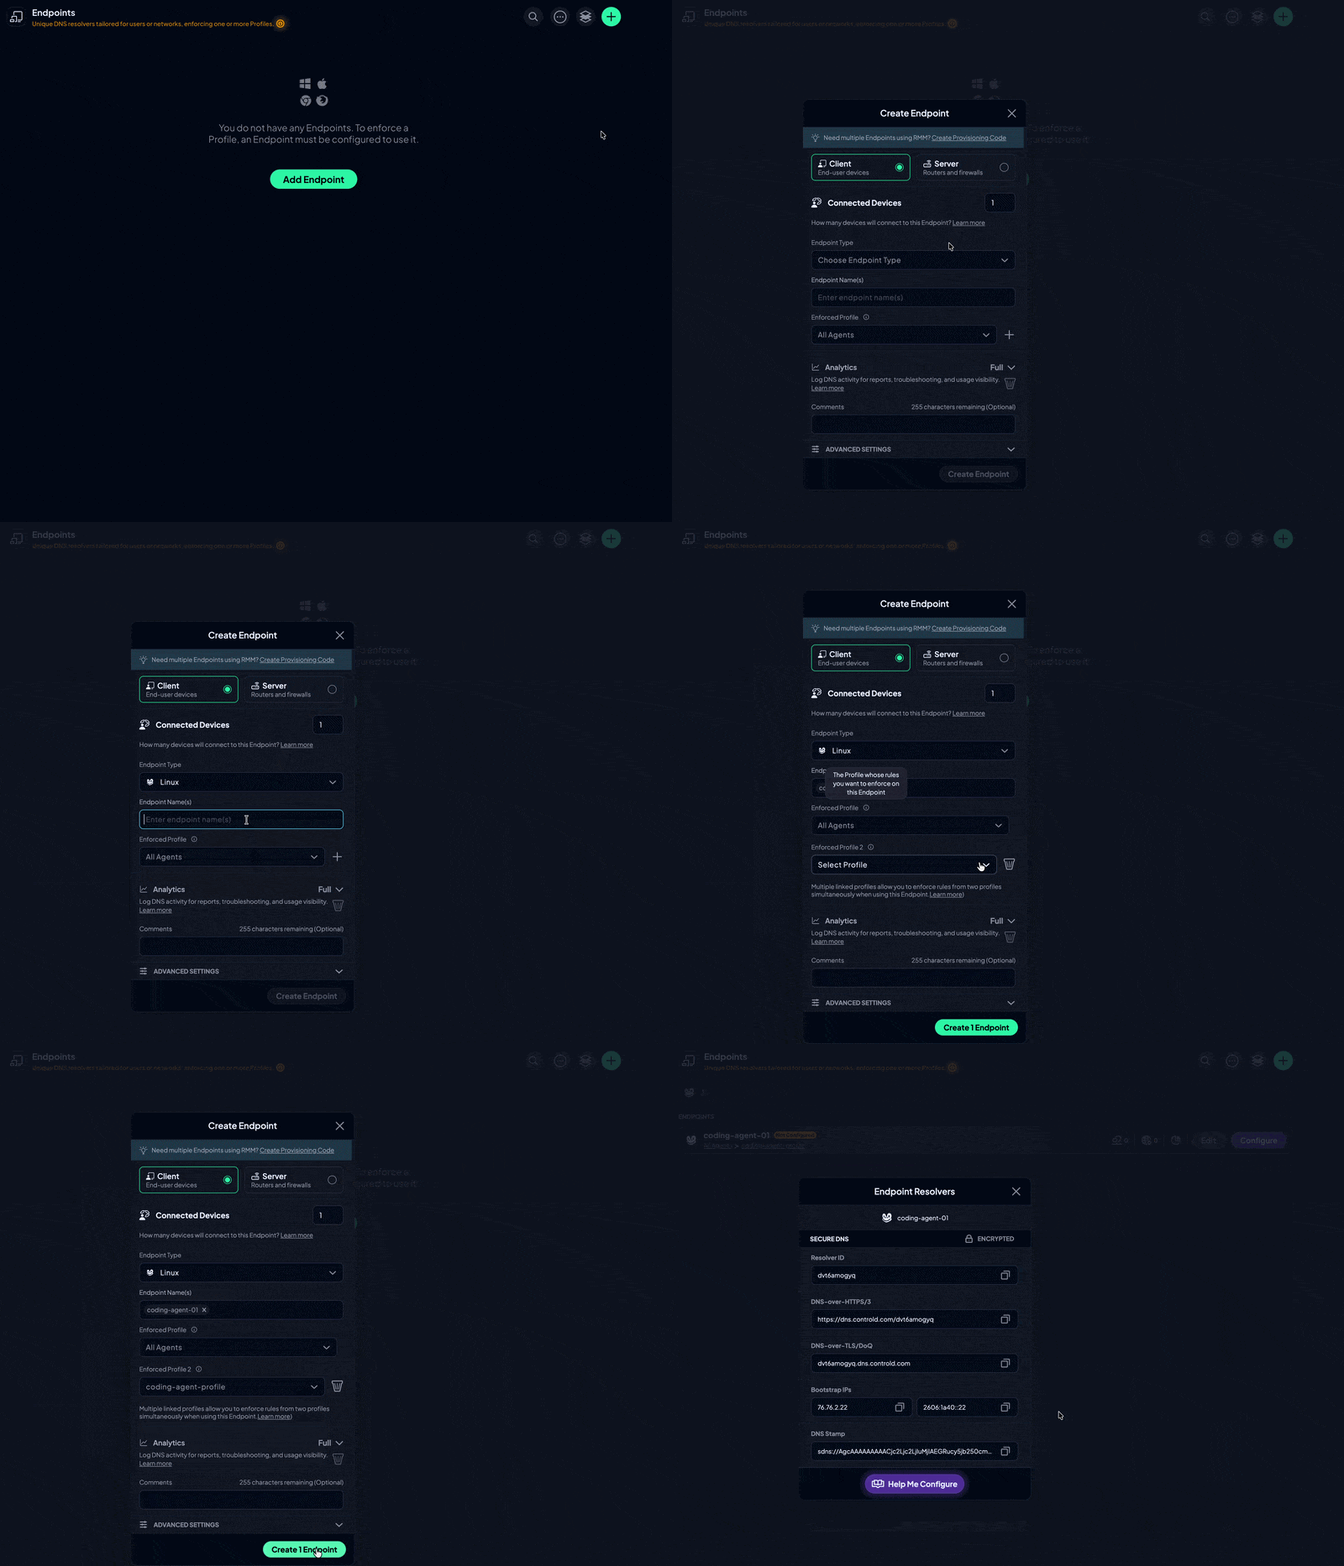
- Go to Endpoints, click +, and choose Linux.
- Name the Endpoint after the agent.
- Under Enforced Profiles, select the All Agents Profile first and the agent-specific Profile second.
- Set Analytics to Full so every lookup is stored.
- Save, then copy the Resolver ID.
Run the installer on the agent's machine as root. The forced flag skips the confirmation prompt, so it also works in scripts.
sh -c 'sh -c "$(curl -sL https://api.controld.com/dl)" -s RESOLVER_ID_HERE forced'Many Agent Machines
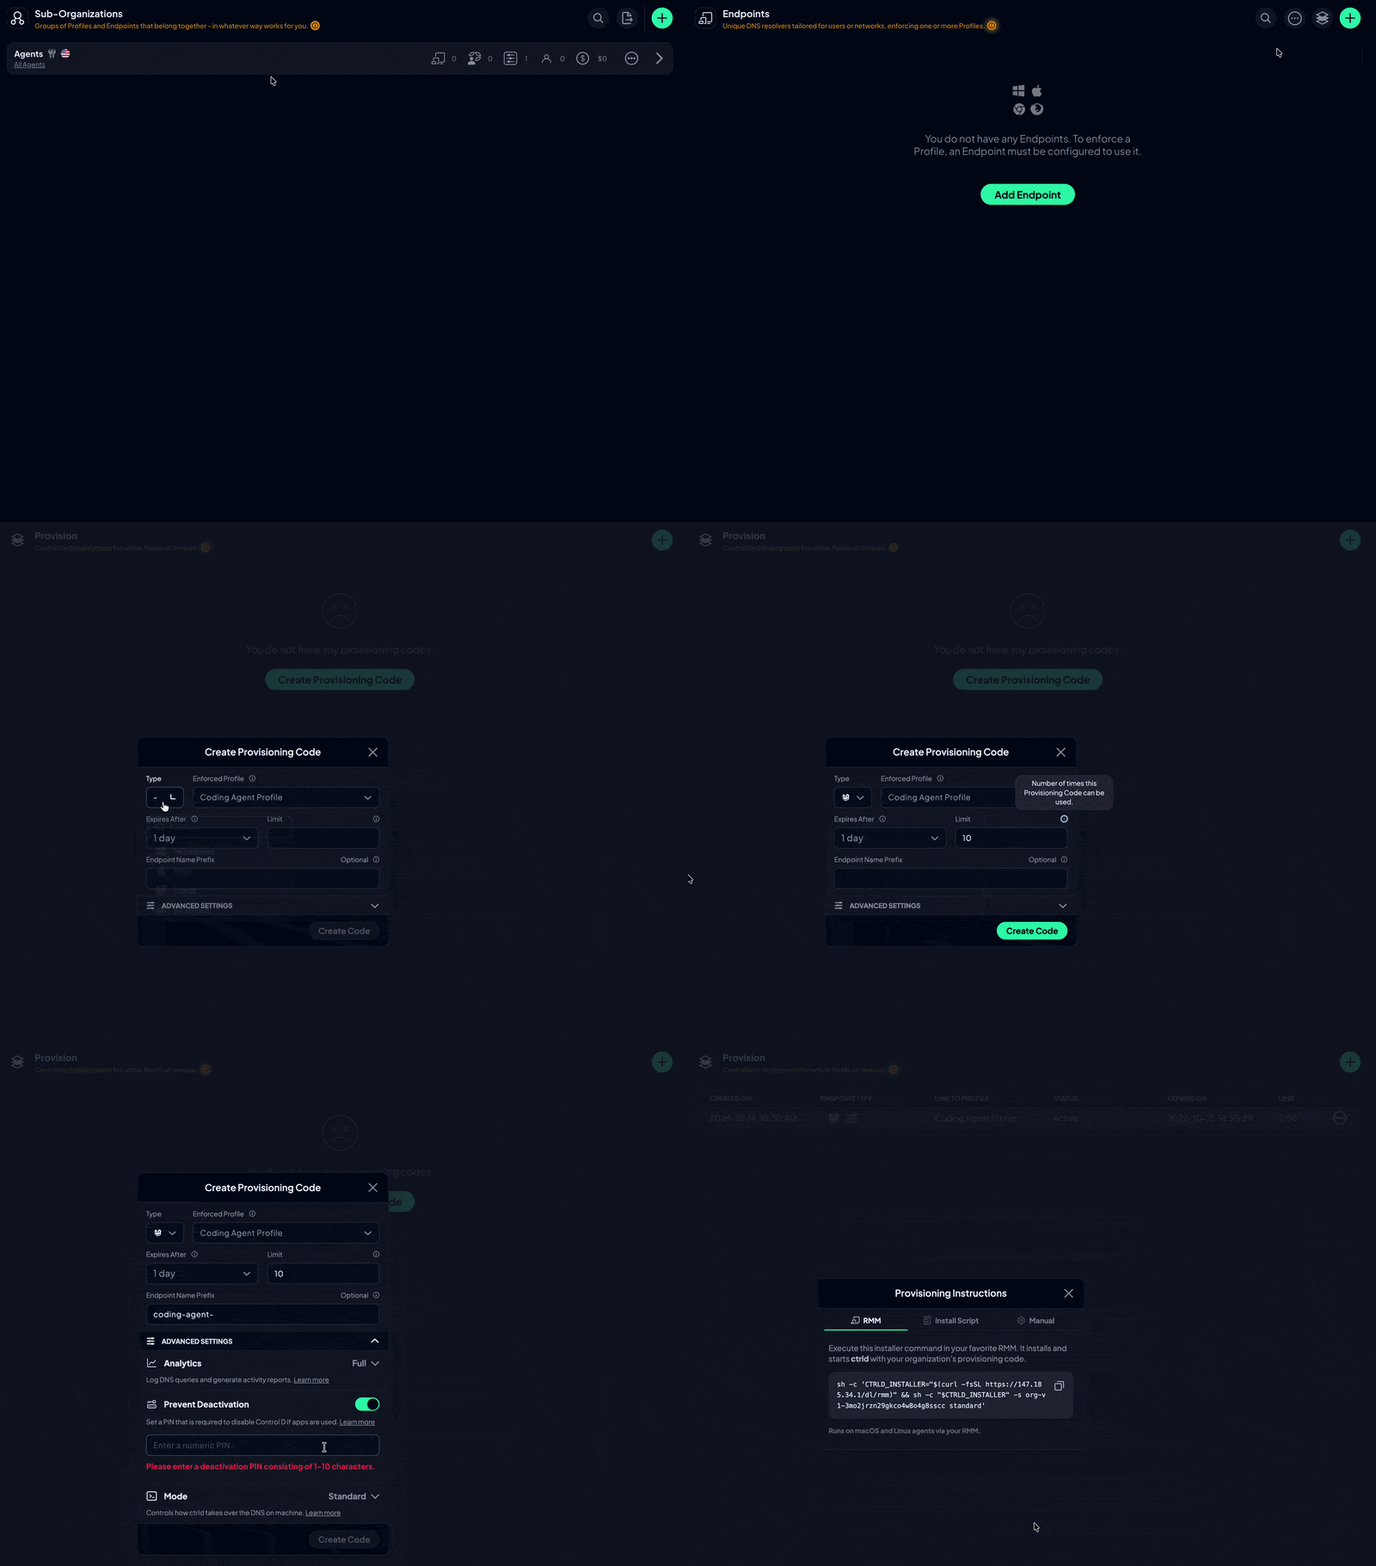
For a fleet, Mass Provisioning registers each machine for you. It requires an Organization account, and each provisioning code enforces one Profile, so the All Agents Profile is applied a different way:
- Create a Sub-Organization for your agents and set "All Agents" as its Global Profile. Every Endpoint created in it inherits that Profile automatically, alongside the agent-specific Profile on its provisioning code.
- In that Sub-Organization, go to Endpoints and click the Provision icon.
- Create a code for each type of agent with these settings:
- Endpoint Type: Linux
- Enforced Profile: the agent-specific Profile
- Endpoint Name Prefix: for example, coding-agent-, so each machine appears as the prefix plus its hostname
- Analytics: Full
- Prevent Deactivation: a PIN (see Step 4)
- Expires After and Limit: high enough to cover your rollout count and time frame
- Run the provisioning command through your remote management tool or the scripts that build your agent machines.
sh -c 'sh -c "$(curl -sSL https://api.controld.com/dl/rmm)" -s CODE_GOES_HERE'Each machine becomes its own Endpoint, so its lookups are logged separately. If your agents run in short-lived sandboxes, add a step to your teardown script that deletes the sandbox's Endpoint through the API.
Agents in Containers or Behind a Shared Gateway
For containers on one host, or sandboxes behind one network gateway, run ctrld once on the host or gateway rather than in each container. On a gateway, ctrld relays each client's hostname and local IP address with its lookups, so Control D logs each agent separately. Containers appear in the Clients list by IP address, which can change when a container is recreated, so if an agent needs its own Profile, run it on its own machine or VM.
Client details are only relayed over DNS-over-HTTPS (DoH), which is the installer's default. A cloud gateway should only listen on its private interface, since we don't recommend running ctrld on a publicly accessible IP. For listener and client discovery options, see ctrld's configuration docs.
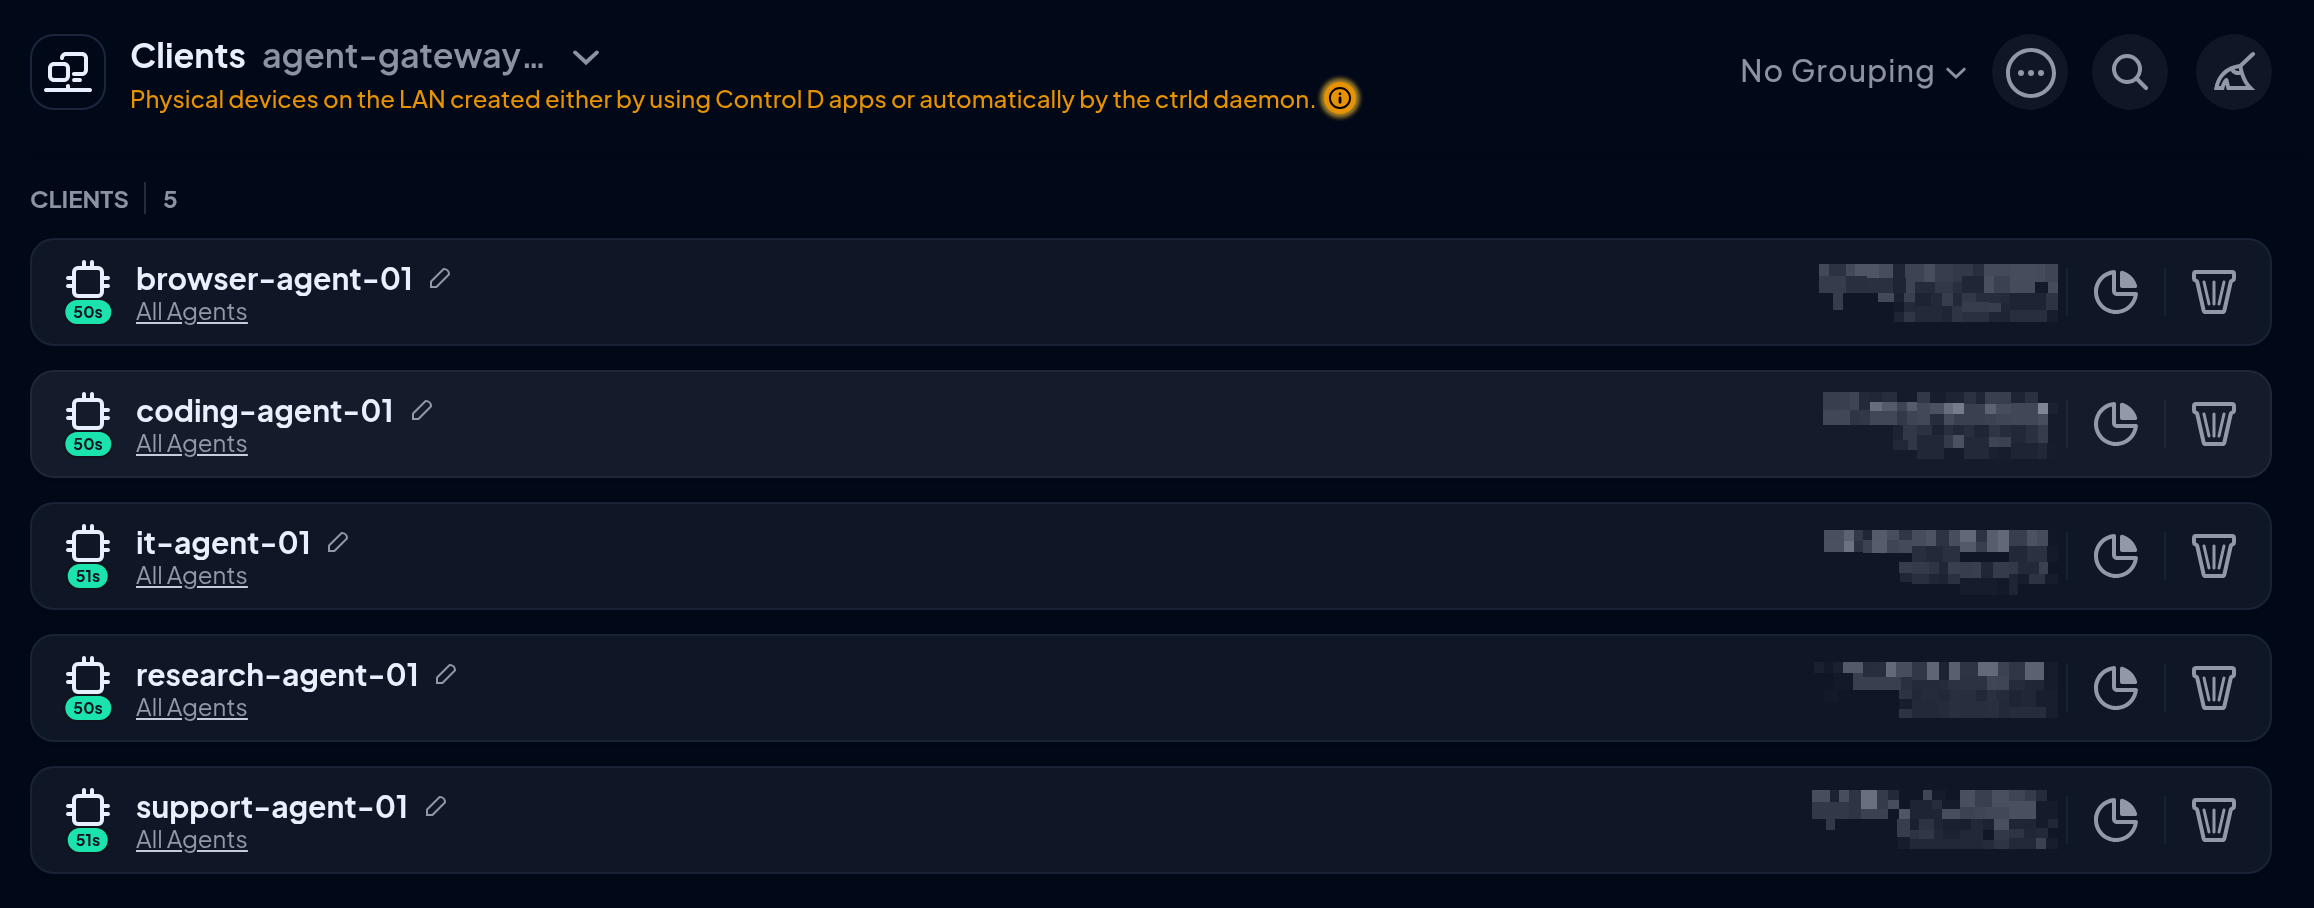
Containers need extra care, because Docker handles DNS differently depending on the network they're on:
- User-defined networks, including Docker Compose's: Docker forwards containers' lookups to ctrld from the host itself, so they're filtered by the host's Profile and logged as the host, unless you point them at ctrld with the DNS setting below.
- Docker's default bridge network: Docker removes the host's local resolver from each container's settings and falls back to Google's public DNS, which skips Control D entirely. Step 4's firewall rules block that fallback, after which these containers won't resolve at all, so use a user-defined network or point them at ctrld with the DNS setting below.
To filter and log each container separately, give ctrld a second listener on Docker's bridge address and point your containers at it. Containers on Docker's default bridge network need this to resolve at all. Docker then sends each container's lookups from the container's own address, so ctrld can tell them apart.
- Open the host's Endpoint, open its ctrld configuration, and in the TOML Config editor, save the config below, replacing RESOLVER_ID with the Endpoint's Resolver ID. The editor replaces ctrld's whole config, so it includes the Control D upstream and the host's normal listener, as well as the new one.
[upstream.0]
  name = "Control D"
  type = "doh"
  endpoint = "https://dns.controld.com/RESOLVER_ID"
  timeout = 5000

[network.0]
  name = "All sources"
  cidrs = ["0.0.0.0/0"]

[listener.0]
  ip = "127.0.0.1"
  port = 53

[listener.1]
  ip = "172.17.0.1"
  port = 53

[listener.1.policy]
  name = "Containers"
networks = [{"network.0" = ["upstream.0"]}]- Run sudo ctrld restart on the host so ctrld fetches the new config right away.
- Add the bridge address to /etc/docker/daemon.json, restart Docker with sudo systemctl restart docker, then recreate your containers:
{
  "dns": ["172.17.0.1"]
}
To cover a single Docker Compose service instead, add dns: 172.17.0.1 to that service.
- Make ctrld start after Docker, since ctrld can't listen on 172.17.0.1 until Docker has created that address:
sudo mkdir -p /etc/systemd/system/ctrld.service.d
printf '[Unit]\nAfter=docker.service\n' | sudo tee /etc/systemd/system/ctrld.service.d/after-docker.conf
sudo systemctl daemon-reload- If the host's firewall blocks incoming traffic, allow UDP and TCP port 53 from Docker's networks to 172.17.0.1.
172.17.0.1 is Docker's default bridge address. If you've changed it with Docker's bip setting, use your address everywhere 172.17.0.1 appears above.
Step 3: Confirm Lookups Reach Control D
On the agent's machine, run:
nslookup verify.controld.comIf the answer shows verify.controld.com as an alias of api.controld.com, the machine's DNS reaches Control D.
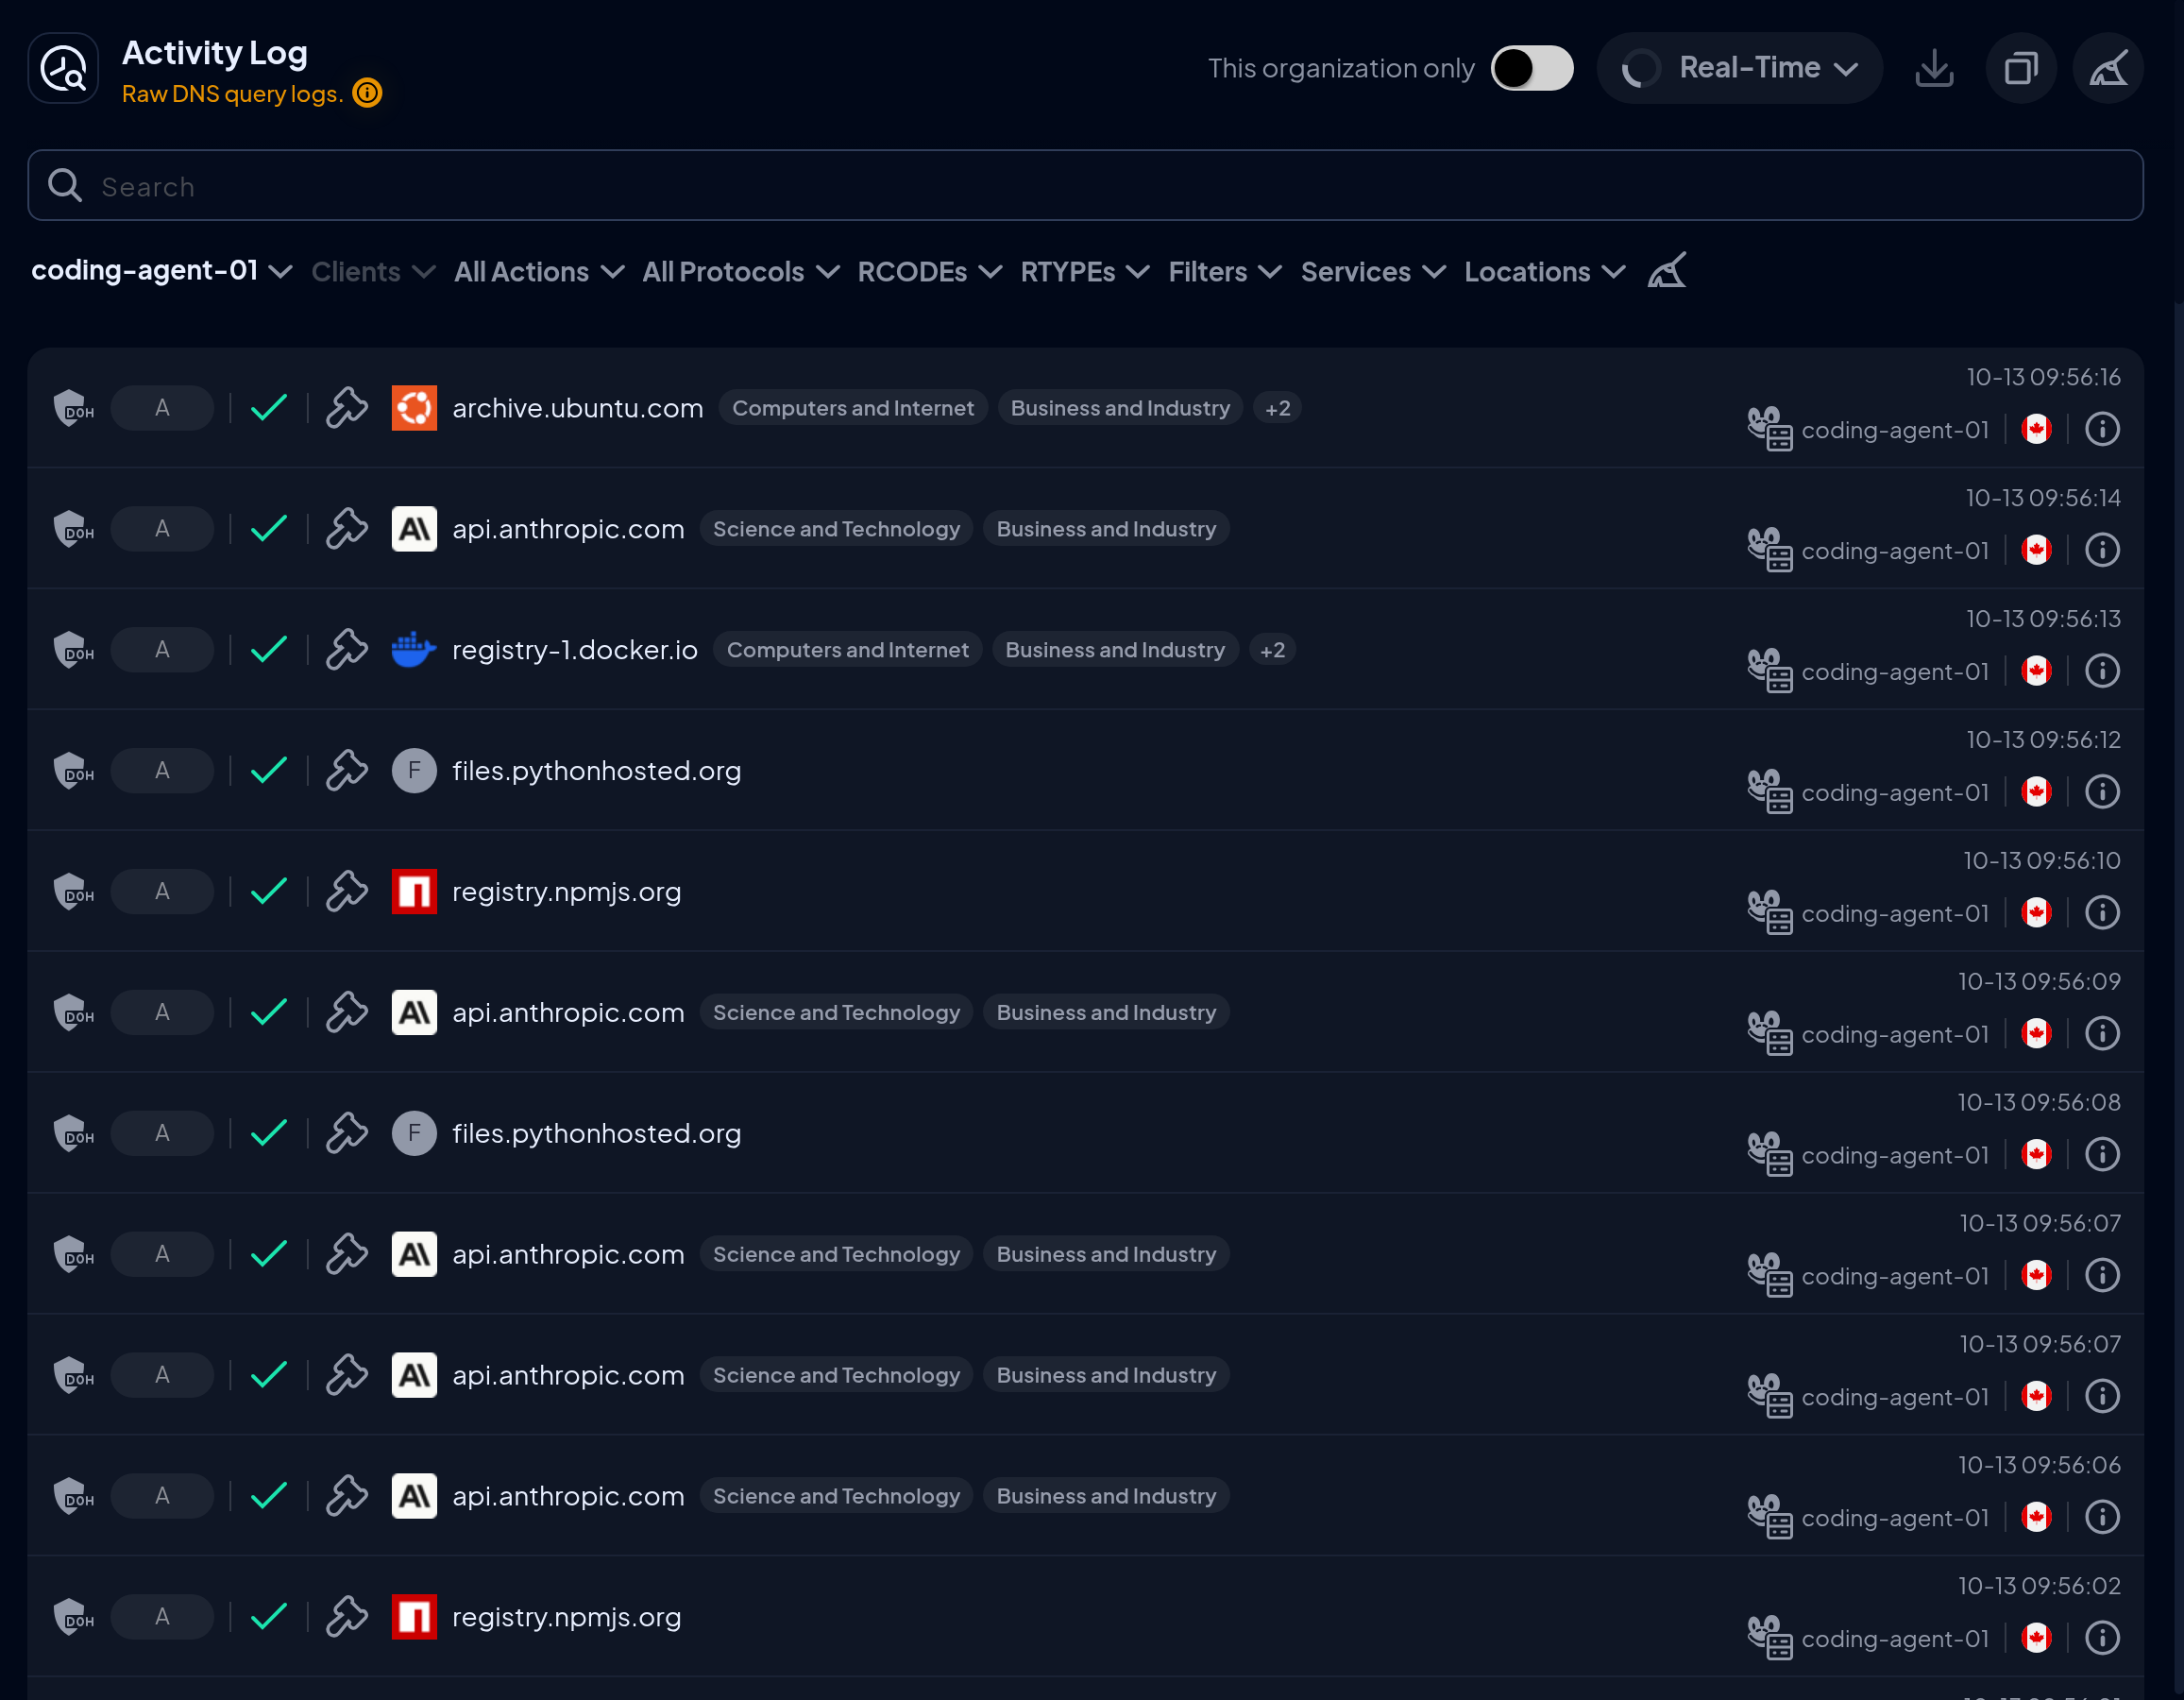
To confirm the agent itself is covered, go to Analytics > Activity Log, select its Endpoint, choose Real-Time from the date menu, and start the agent on a normal task. Its lookups should appear as it works. If the log stays empty, follow the How to Debug ctrld documentation.
Step 4: Stop Agents From Going Around Control D
Once lookups are flowing, make sure the agent can't route around them. An agent with root access can change the machine's DNS settings or query another resolver directly, so these access controls are what make the policy hold on Linux:
- Run agents without admin rights. Use an unprivileged user with no sudo access, and don't run agent containers as privileged or with the NET_ADMIN capability. Agent containers on Docker's host network must not run as root either.
- Force DNS through Control D. Add a firewall rule that lets only ctrld, which runs as root, reach Control D's servers, and drops DNS traffic everywhere else (example below).
- Leave port 443 open. Restricting it to Control D would break every HTTPS connection. The VPN & DNS Filter blocks DNS-over-HTTPS providers by name, but agents can still reach a provider by IP address, so add the IPs of any providers your agents don't need to the drop rules in the example below.
- Limit hard-coded IP connections. These skip DNS entirely, so for agents with narrow jobs, only allow outbound traffic to the networks they need.
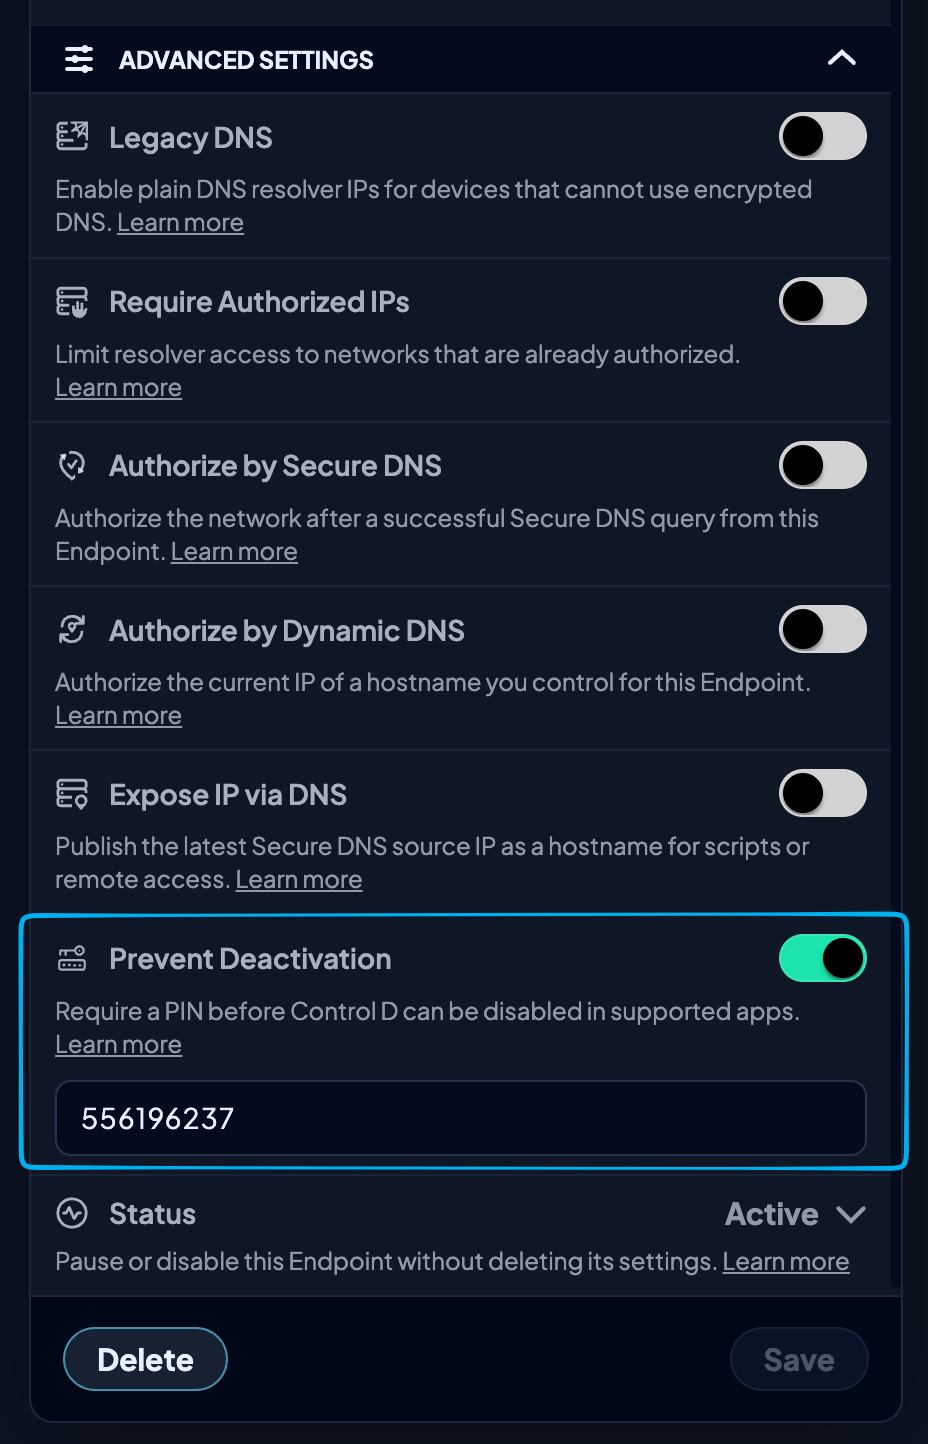
- Set a deactivation PIN. Turn on Prevent Deactivation on the Endpoint or in the provisioning code, and stopping or uninstalling ctrld will require the PIN. A root user can still change DNS settings directly, so the PIN doesn't replace the controls above.
- Keep Control D credentials away from agents. An agent with a write-enabled API token could change its own policy. Use Read tokens where you can, and restrict every token to your automation machines' IP addresses.
This nftables example lets only root processes, such as ctrld, reach Control D's servers, blocks every other user from them, and drops plain DNS and DNS-over-TLS (DoT) to anywhere else. The output chain covers programs on the machine itself, and the forward chain applies the same blocks to containers and to devices behind a gateway. The current ranges are on the Control D IP Ranges page.
table inet agent_dns {
  chain output {
    type filter hook output priority 0; policy accept;
    oif "lo" accept
    ip daddr { 76.76.2.0/24, 76.76.10.0/24 } meta skuid 0 accept
    ip6 daddr { 2606:1a40::/48, 2606:1a40:1::/48 } meta skuid 0 accept
    ip daddr { 76.76.2.0/24, 76.76.10.0/24 } drop
    ip6 daddr { 2606:1a40::/48, 2606:1a40:1::/48 } drop
    udp dport { 53, 853 } drop
    tcp dport { 53, 853 } drop
  }
  chain forward {
    type filter hook forward priority 0; policy accept;
    oifname { "docker0", "br-*" } accept
    ip daddr { 76.76.2.0/24, 76.76.10.0/24 } drop
    ip6 daddr { 2606:1a40::/48, 2606:1a40:1::/48 } drop
    udp dport { 53, 853 } drop
    tcp dport { 53, 853 } drop
  }
}
The first forward rule keeps containers able to reach each other. Save the rules in their own file and load it at startup, rather than adding them to the stock /etc/nftables.conf, which clears every rule on reload, including Docker's.
Step 5: See What Each Agent Looks Up
With the machines locked down, let your agents run their normal workloads for about a week. You'll then have a real answer to "what did our agents look up last week?"
- Activity Log: select an Endpoint, and for agents behind a gateway, the agent under Clients, to see every domain it resolved.
- Statistics: shows the most-queried domains, which is the quickest way to draft an allowlist.
- Action filter: shows what the All Agents Profile already blocked. A run of blocked lookups to DNS providers, tunneling services, or new domains from an agent doing routine work is worth investigating.
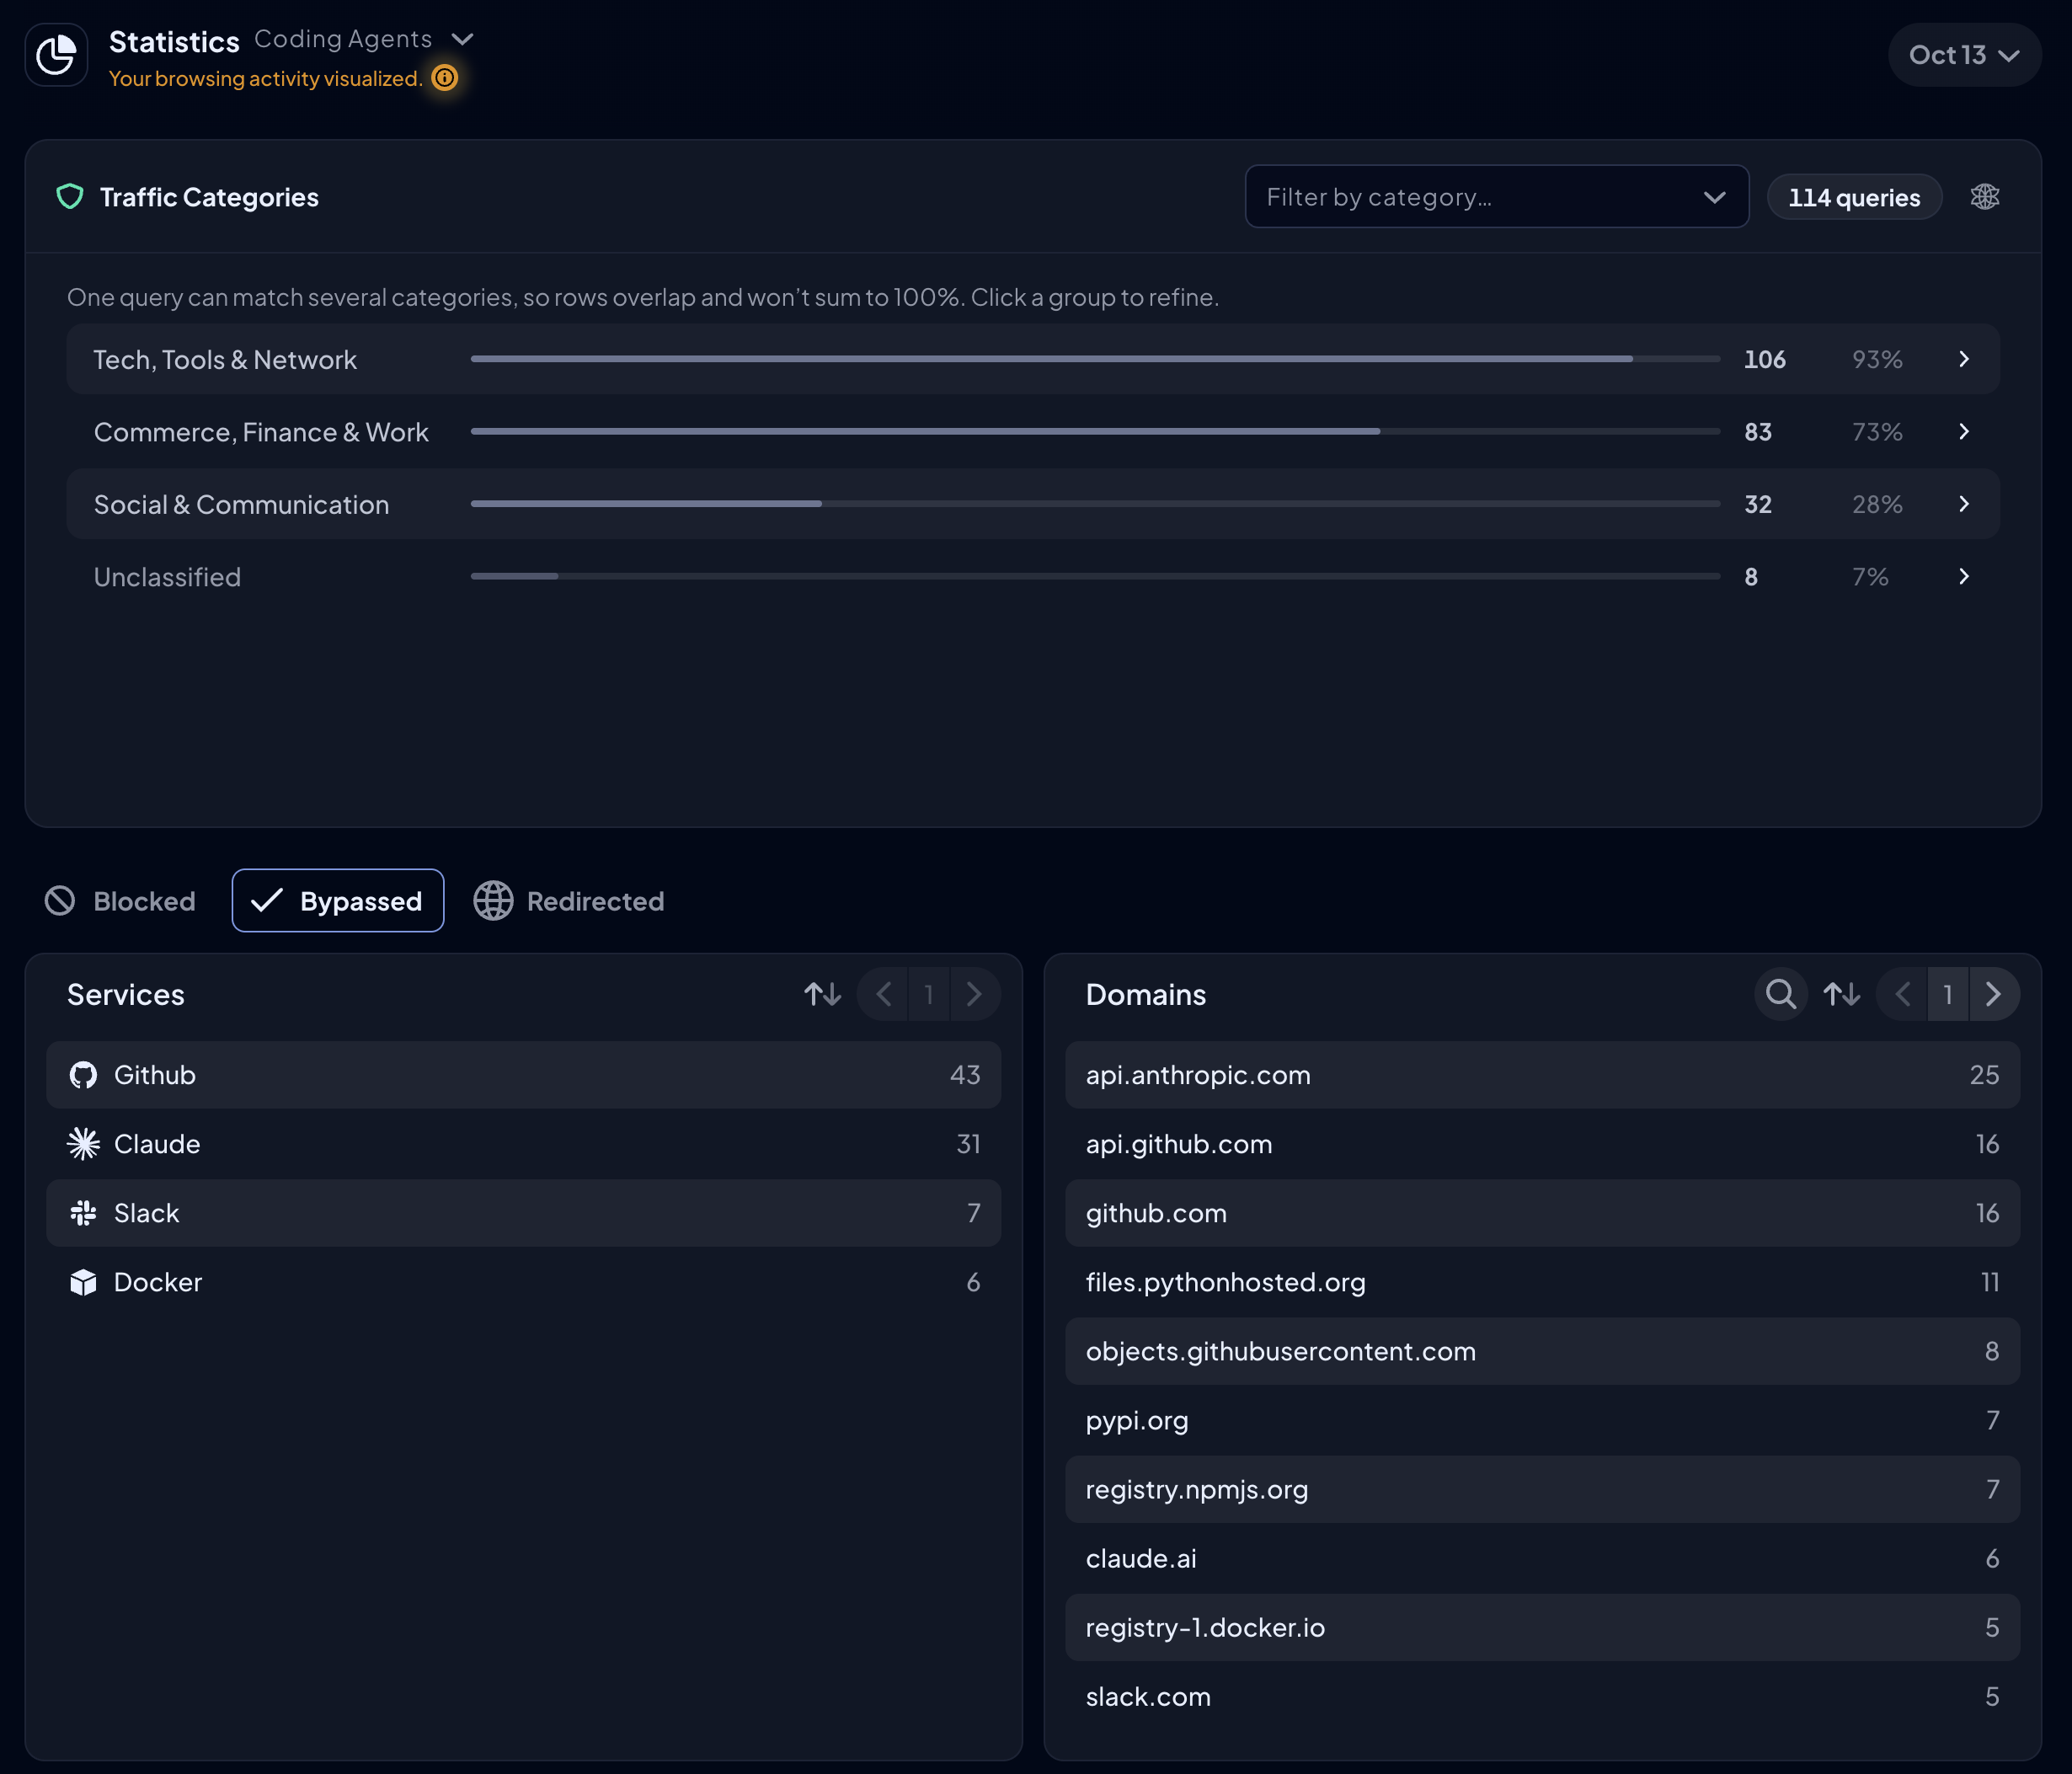
Raw query logs are kept for one month, so finish the review in that window or export the logs as CSV from the Activity Log.
Step 6: Tighten Each Agent to an Allowlist
When you know what an agent needs, open its agent-specific Profile, go to Profile Options, and set the Default Rule to Block. From then on, only domains you've explicitly allowed will resolve.
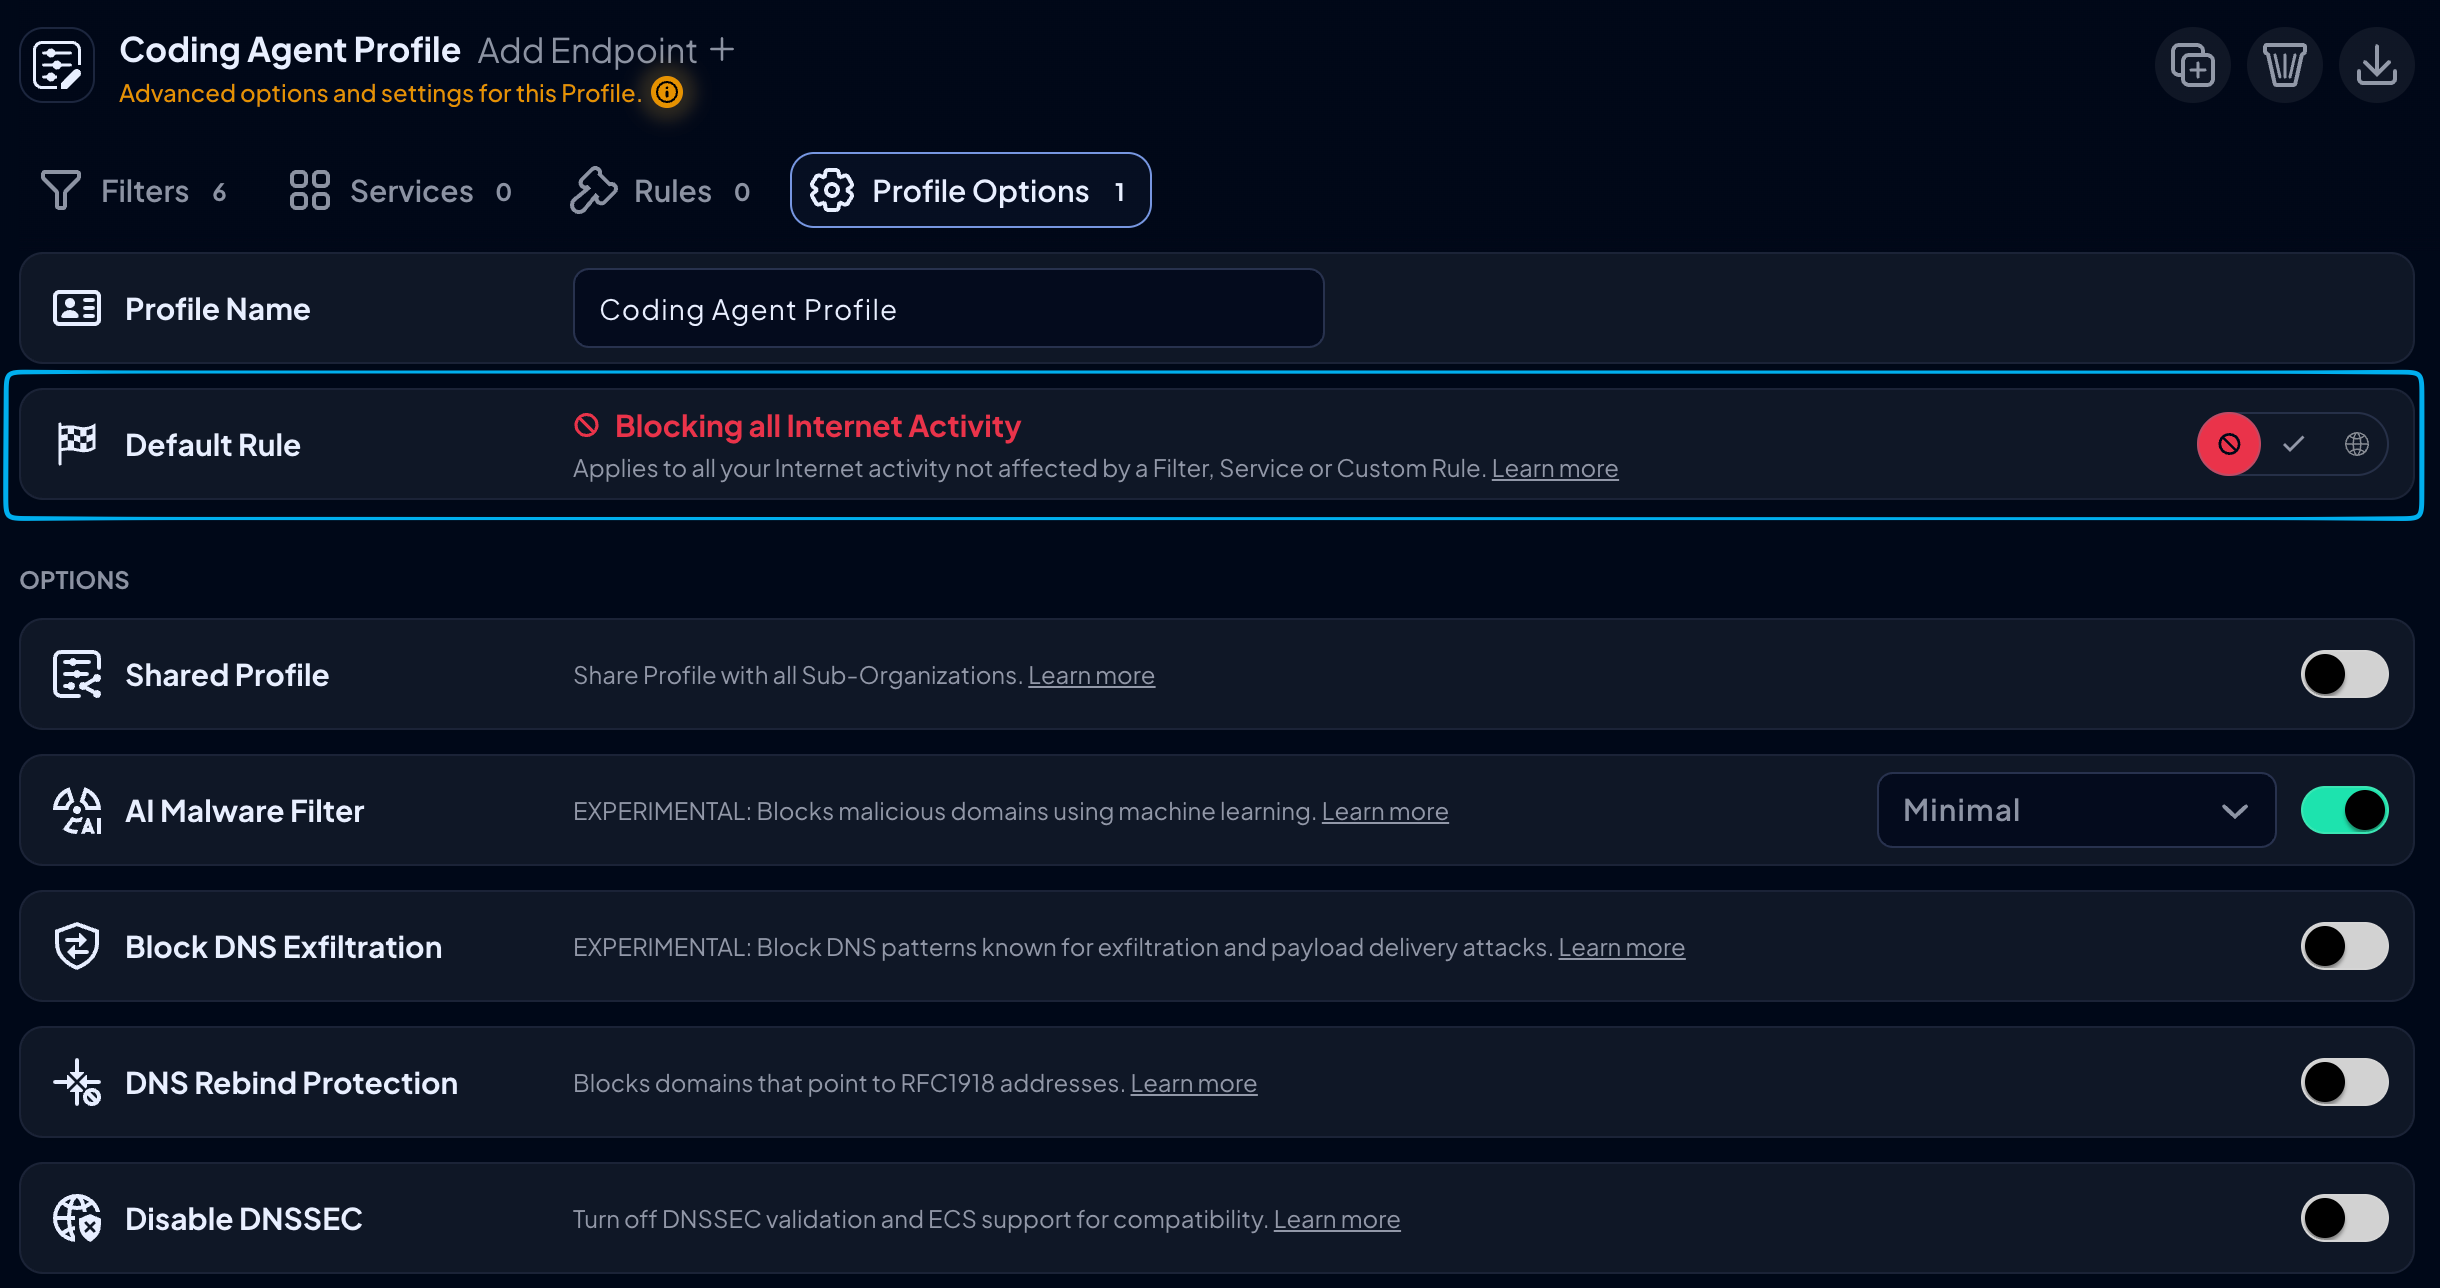
Control D checks Custom Rules first, then Services, then Filters, then the Default Rule. That means an allowed domain resolves even if a Filter would block it, so stick to least-privilege access and only allow what the agent needs.
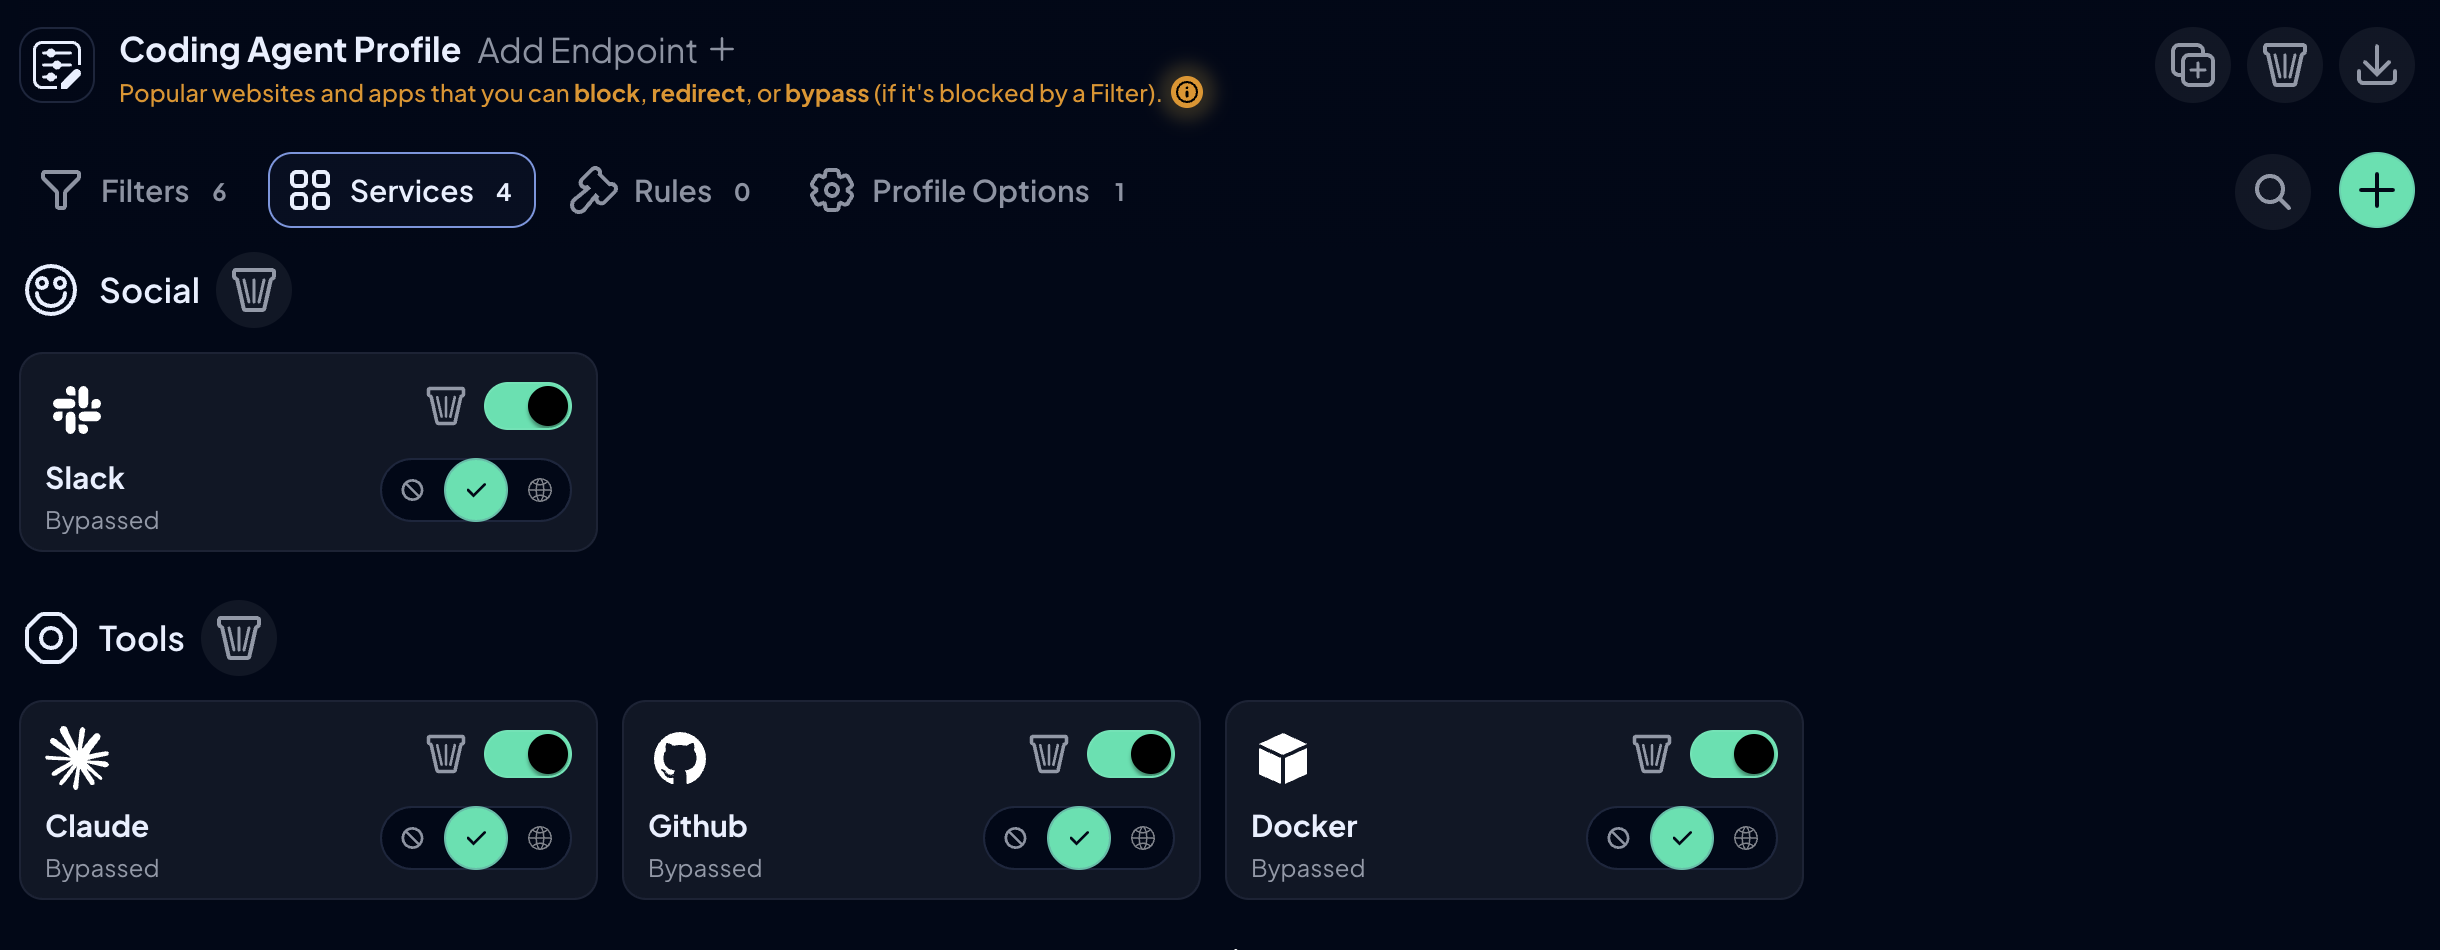
Use Services where applicable
We maintain Services for AI tools and other platforms, including OpenAI, Claude, Gemini, GitHub, Docker, Zendesk, Salesforce, Atlassian, and Slack.
Setting one to Bypass allows the domains we've mapped to that platform in one step, and the Activity Log will show anything the agent still can't reach. ChatGPT and OpenAI are separate Services, so check which one your agent uses.
Use Custom Rules for everything else
Add a Custom Rule set to Bypass for each hostname. A rule for example.com also allows every subdomain under it, which is fine for your own domains. On shared platforms such as cloud storage, hosting, or tunneling services, anyone can create a subdomain, so allow the exact hostname, such as your-bucket.s3.amazonaws.com, never amazonaws.com.
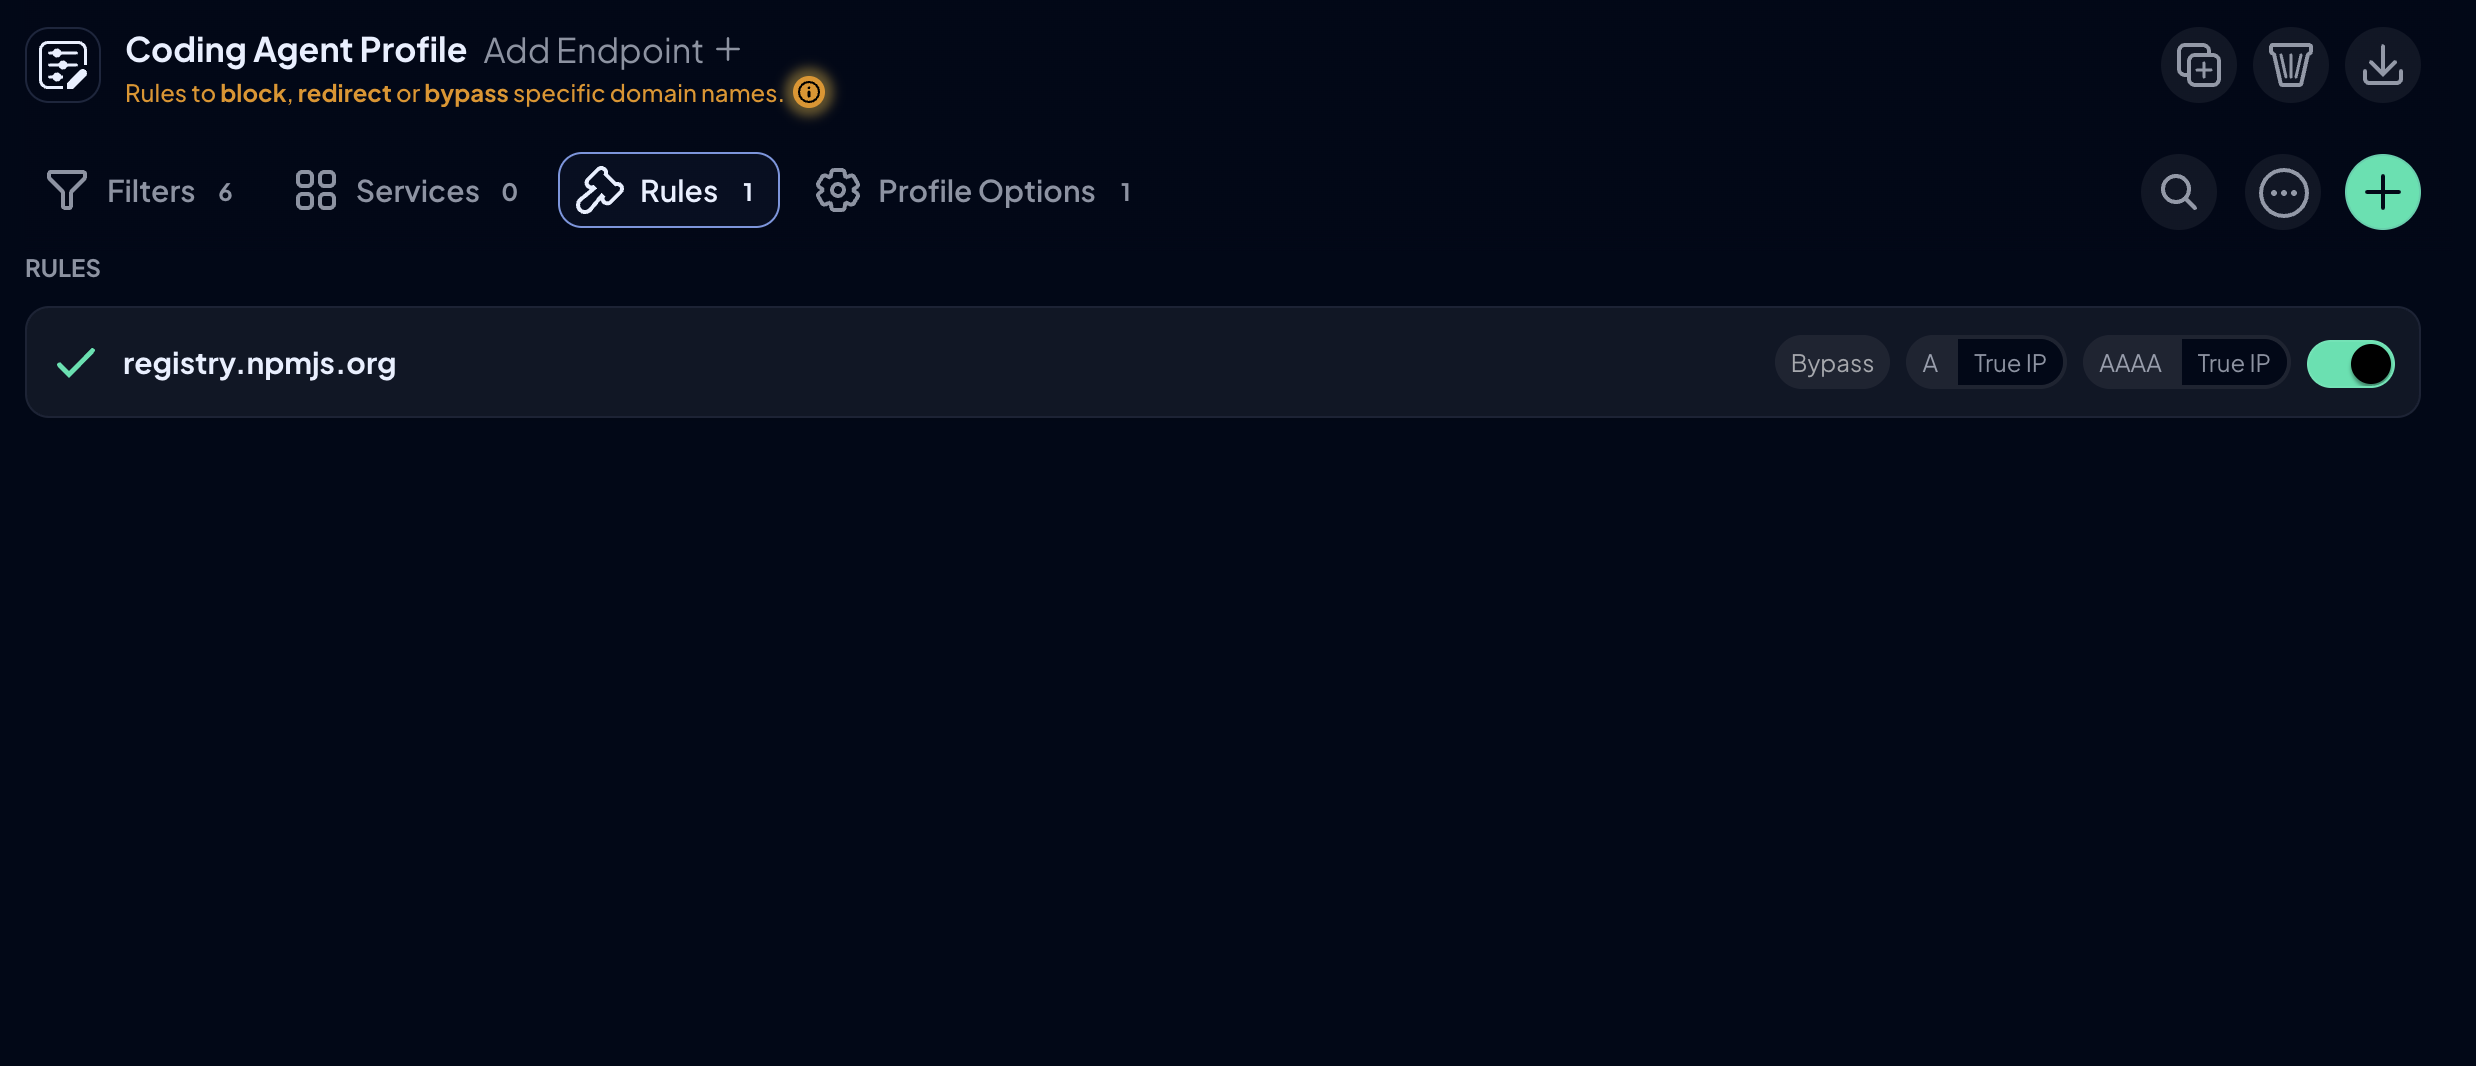
Remember to allow what each tool depends on, such as sign-in pages, content delivery networks, and any remote Model Context Protocol (MCP) servers the agent connects to. After switching to Block, watch the Activity Log for a day and allow anything legitimate the agent can no longer reach.
Step 7: Turn On Block DNS Exfiltration
Agents on an allowlist mostly don't need this, since unapproved domains are already blocked and Bypass rules override it for approved ones. Turn it on for agents that keep the Default Rule on Bypass, such as research agents.
The Block DNS Exfiltration feature blocks the most common ways of hiding data in DNS lookups by blocking certain query types, such as TXT, or rewriting their responses, and by blocking DNS patterns associated with exfiltration.
To turn it on, open the agent-specific Profile, go to Profile Options, and enable Block DNS Exfiltration, below AI Malware Filter. The option is currently experimental.
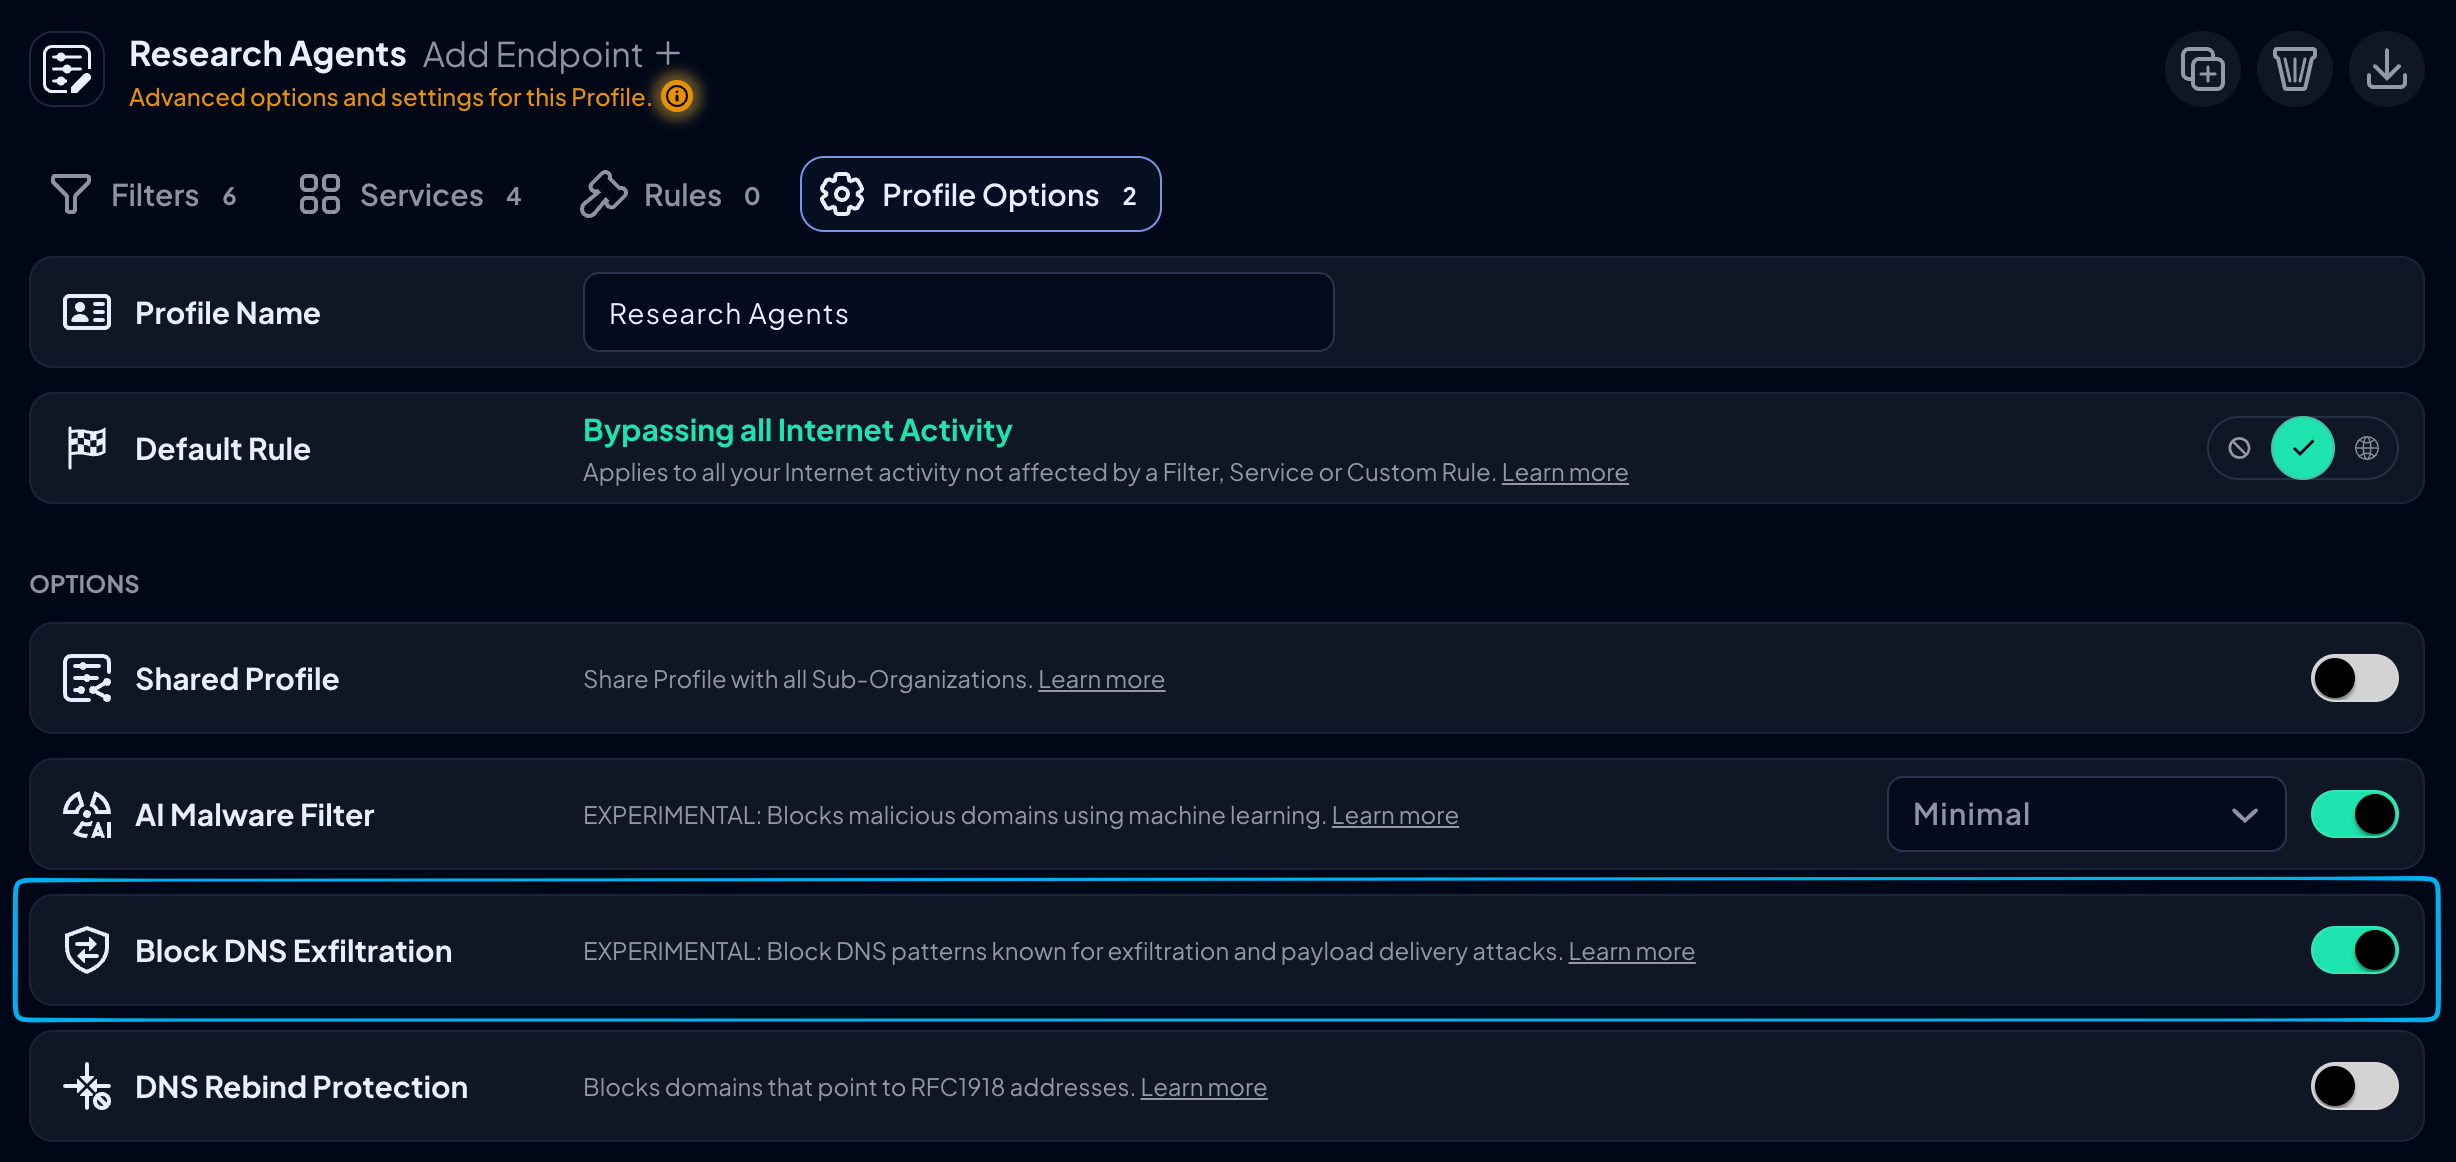
We designed it for client devices and don't recommend it for servers that rely on unmodified DNS responses. Most agents only need ordinary address lookups, but agents that rely on TXT or other less common record types, such as for email verification or service discovery, may break. Test it on one machine first, and if something breaks, add a Bypass Custom Rule for that domain. Only bypass domains you trust.
Step 8: Test Your Limits
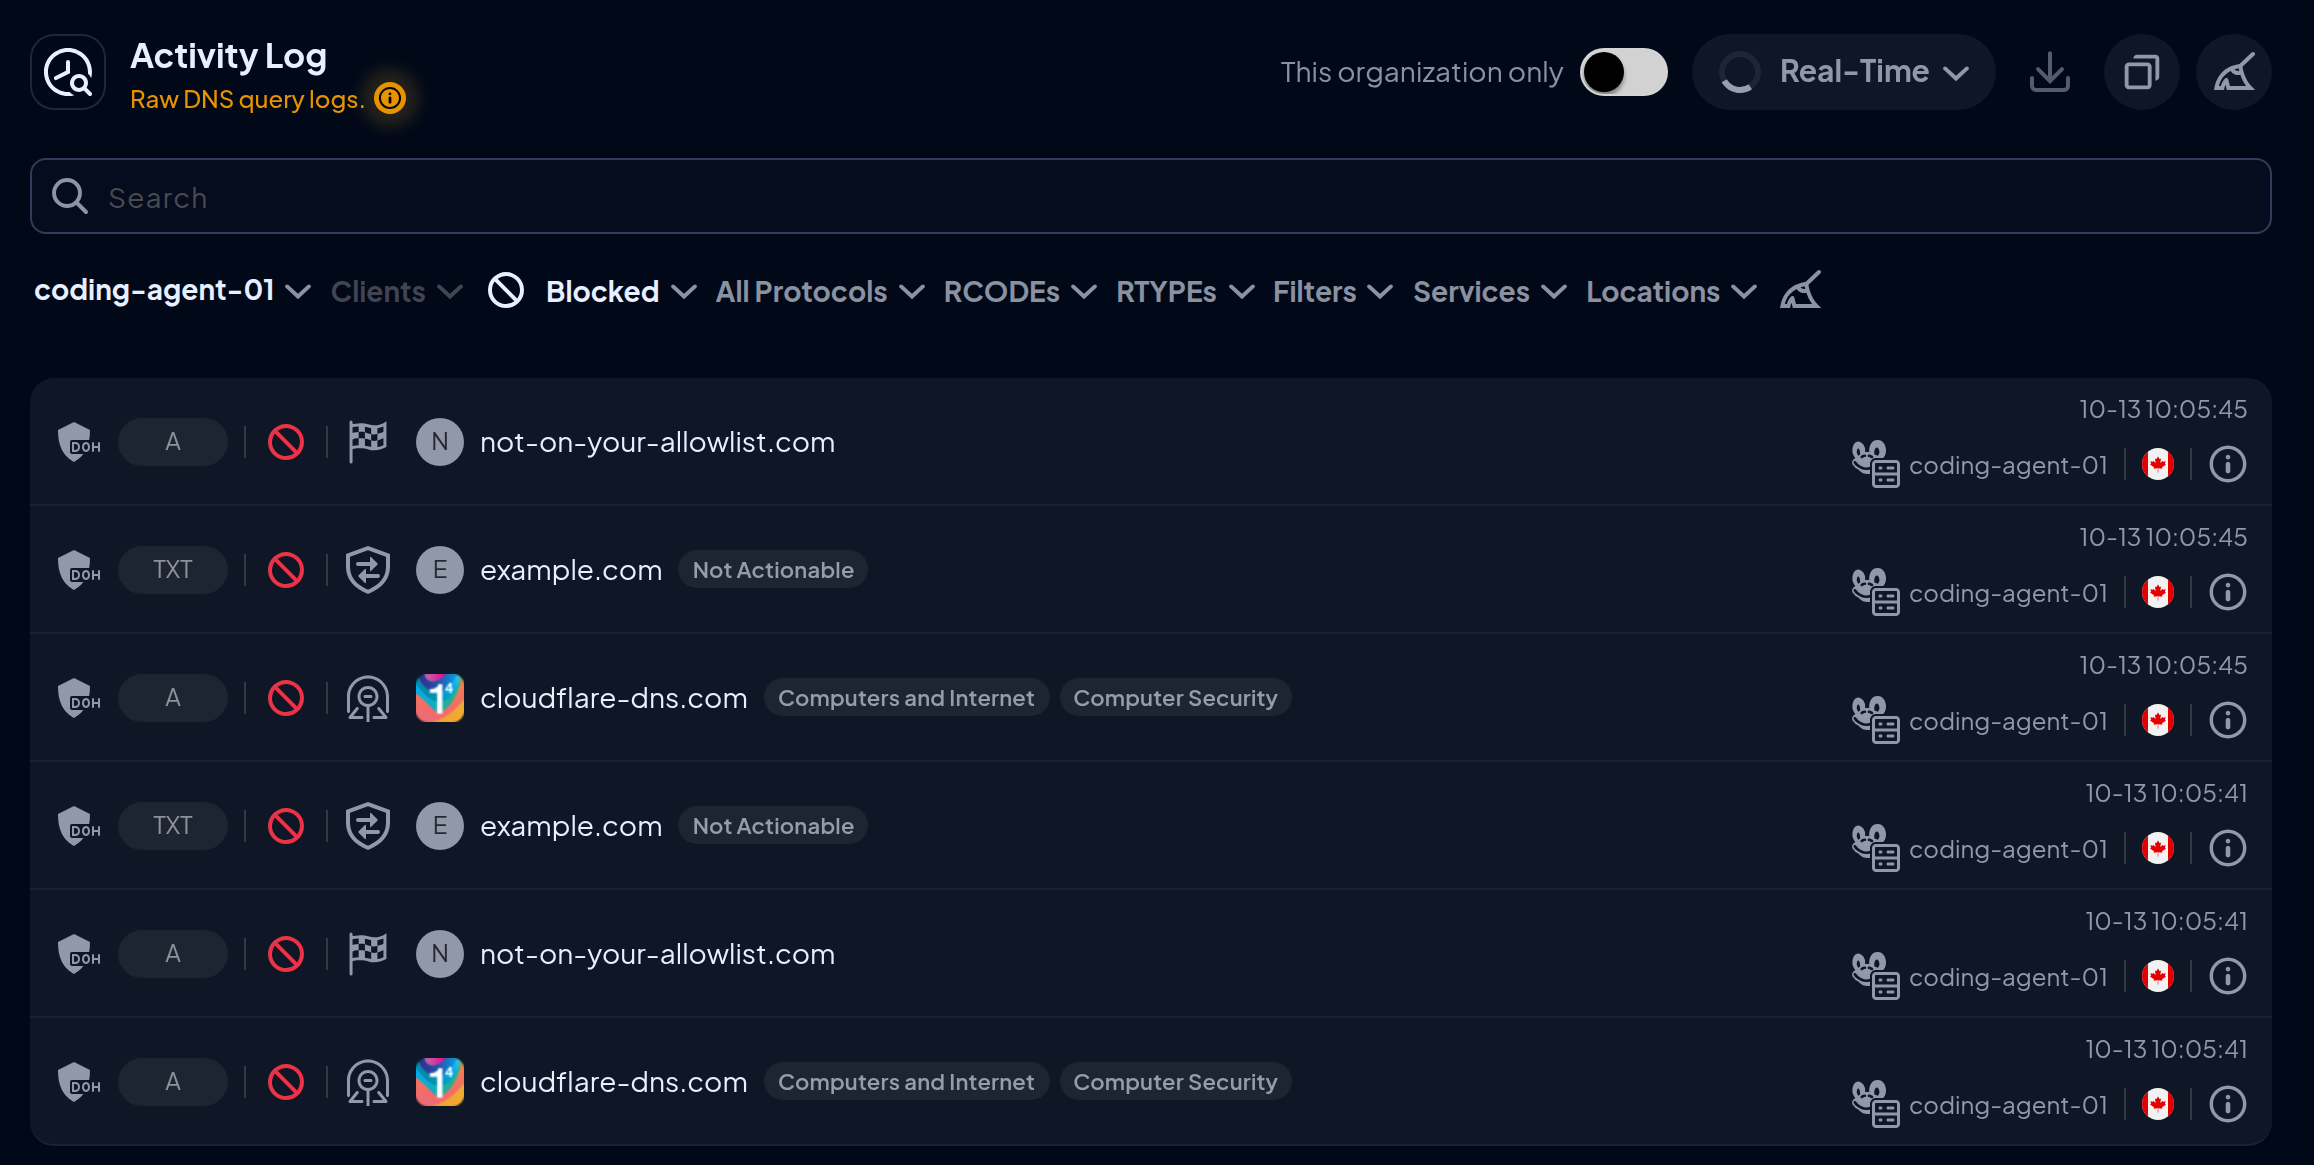
Before you rely on the setup, try to get around it. These checks follow the routes OpenAI's research agent tried in September, when its direct queries to public DNS went unanswered, and it tunneled through its environment's own resolver instead. Run them as the agent's user:
# Allowlisted agents only, a domain not on the allowlist: should return 0.0.0.0
dig +short not-on-your-allowlist.com

# Direct query to a public resolver: should time out
dig +short example.com @8.8.8.8

# Direct query to Control D's free resolver: should time out
dig +short example.com @76.76.2.0

# DNS-over-HTTPS provider: should return 0.0.0.0
dig +short cloudflare-dns.com

# Agents with Block DNS Exfiltration on, such as research agents: should return nothing
dig +short TXT example.com
The agent's user also shouldn't be able to edit /etc/resolv.conf or change firewall rules. To test the PIN, run ctrld stop as root without it, and the command should be refused. Finally, check that each attempt appears in the Activity Log against the right agent.
If your agents run in containers, run the same checks inside one that has dig installed, using docker exec, since container traffic follows different firewall rules.
Example Policies for Five Common Agents
Each of these also enforces the All Agents Profile from Step 1.
| Agent | Default Rule | Allow | Block DNS Exfiltration |
|---|---|---|---|
| Customer support | Block | Your helpdesk, your knowledge base, and one approved AI provider | Optional |
| IT | Block | Your remote management platform, your ticketing system, and your AI provider | Optional |
| Browser | Block | The web apps it works in, your identity provider, and the content delivery networks they load from | Optional |
| Coding | Block | Your code repository, the package registries it installs from, and your AI provider | Optional |
| Research | Bypass | Nothing extra, since it relies on the All Agents Profile's Filters | On |
Worked Example: A Coding Agent
A coding agent in a Linux sandbox might need GitHub, npm, PyPI, and Claude. In its agent-specific Profile, you'd:
- Set the GitHub and Claude Services to Bypass.
- Add Bypass Custom Rules for registry.npmjs.org, pypi.org, and files.pythonhosted.org, since package registries aren't Services.
- Set the Default Rule to Block.
If a hidden instruction in a pull request then tells the agent to send an API key or other sensitive data to an outside domain, the lookup is blocked and logged against that sandbox.
Keep Watching Your Agents
Update an agent's allowlist whenever you give it a new tool, and review its blocked lookups regularly. Control D doesn't send real-time alerts, but Organization accounts can schedule Email Reports daily, weekly, or monthly.
There's also SIEM Log Streaming to send your query logs to the tools your security team already uses, so you can alert on blocked lookups there. Organization accounts also get Admin Logs, which record changes to your Profiles, so you can see who loosened a policy and when.
Once you set up your first agent, each subsequent one takes far less work, since the All Agents Profile, firewall rules, and tests carry over. You only need to create its agent-specific Profile, install ctrld, and tighten it once you've seen what it looks up.