Simplicity of Setting Up Control D for Businesses
We take you through the short and simple process of getting started with Control D as a business.
These days, the importance of utilizing a customizable DNS resolver cannot be understated. From ads and malicious content to malware attacks and privacy breaches, businesses face risks every day.
However, finding a solution that seamlessly fits into your existing IT infrastructure or one that a small business can quickly implement without any prior tech expertise is a major challenge — or is it?
As you’re about to find out in this article, within the time it takes you to make a coffee, you can successfully deploy Control D to all Endpoints (devices) and/or routers in your business - no matter how many there are.
Does it sound too good to be true? We’re about to show you why it’s not.
Table of Contents
How to set up Control D for businesses
- Create your business account
- Create your Profile(s)
- Add your Endpoint(s) and/or router(s)
- Add your Sub-Organization(s) – Optional
How to Set Up Control D for Businesses
There’s a simple 4-step process to get things up and running:
- Create your business account
- Create your Profile(s)
- Add your Endpoint(s) and/or router(s)
- Add your Sub-Organization(s) – Optional
Of course, setting up Control D for personal use will be slightly easier than setting it up for business use. However, there’s only one additional step, and the entire process is still incredibly quick. Let’s explore each step in further detail.
1. Create your business account
First, navigate to the onboarding page, where you can set up your business account. This will be the Owner account, which has total control over all your Endpoints, routers, and DNS settings for your business. Simply enter your details and click Create Business Account.
Once you’ve entered your details, you will be automatically directed to the Control D dashboard – this is where the fun begins. Here, you will be presented with a complete overview of your very own DNS management system, including your account settings, billing, and analytics.
As with most businesses, you may have a team of people to whom you want to provide specific access and permissions, such as your IT team or business partner. This is easily managed in the My Organization tab at the top of the page, where you can add members and alter their permissions from Owner, Admin, and Viewer.
Now that you’re in the Dashboard, the next step is to create your Profile(s).
2. Create your Profile(s)
Profiles are the policies, rules, and behaviors that govern a device or router. It's one of the most crucial parts of the dashboard – and likely where you’ll spend most of your time.
To create a Profile, navigate to the Profiles tab, click the green + icon in the top right-hand corner, and enter a Profile name.
It’s highly probable that you’ll create multiple Profiles for different use cases, so it’s important to understand the four key areas when creating and editing a Profile:
- Filters
- Services
- Custom Rules
- Profile Options
Filters
Filters enable you to block an entire category of websites from being resolved, such as Dating, Gambling, or Social Media sites.
This is great for when you want to take a blanket approach towards types of websites instead of individual ones. For instance, a school that wants to safeguard kids against adult content on its network can do so by clicking a single button.
Many of the Filters have various block modes to choose from, such as Relaxed, Balanced, and Strict. A stricter blocklist will block more niche websites. However, this may result in more false positives, so it’s best to test all settings to see what mode works best for your use case.
While this is a basic, safe approach to your DNS configuration, you may want more authority over what’s resolved and what isn’t.
Services
Services allow you to control and block the most commonly used websites, apps, and platforms – whether that’s just one or multiple at a time.
Unlike other DNS resolvers on the market, Control D offers over 1,000 blockable Services in various categories, ensuring you have complete control over your DNS settings.
For instance, you want to block TikTok and Facebook on a device but leave all other social websites unblocked. You can do so by navigating to Services > Social and toggling on blocking services specifically for TikTok and Facebook while leaving the rest untouched. But that’s not all.
In addition to blocking, you also have the option to enable a bypass rule or redirect the domain to a proxy location in one of 60+ countries – or to a specific IP address of your choosing.
If your business has even more specific needs and requirements, this is where you can utilize Custom Rules.
Custom Rules
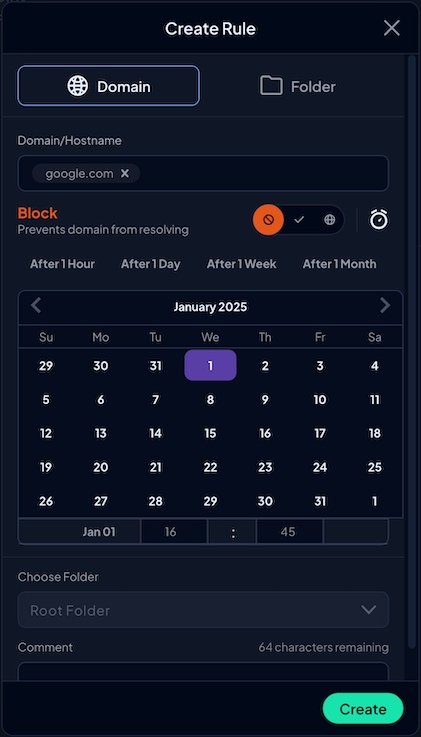
Custom Rules allow you to have granular control over which domains are resolved and which rules take priority.
You can assign rules to Folders, which allows you to organize them clearly based on their use case, and set a timer for how long you want this rule to be enforced.
Much like Services, you can choose from three rule types: Block, Bypass, and Redirect.
Custom Rules may not apply to all businesses, but it’s nice to know that the option exists if necessary.
Profile Options
Profile Options offer various configurations out of the gate. Examples include toggling on Safe Search, AI Malware Filter, Redirect TTL, Disable DNSSEC, and much more.
You can read more about these advanced Profile Options in our documentation.
3. Add your Endpoint(s) and/or router(s)
Once you’ve set up your Profiles, you can begin adding your Endpoints (devices). This article will focus on adding an Endpoint, but you can check out our detailed guide on how to set up Control D for routers if that applies to you.
There are two methods to do this:
- Add each Endpoint individually
- Mass deployment to all Endpoints using an RMM/MDM tool
Add each Endpoint individually
- Click the green + icon
- Enter the number of devices that will connect to this Endpoint
- Select the operating system of the Endpoint or browser you want Control D to run on
- Enter a name or email for this Endpoint
- Assign it to a Profile
- Click Create.
You will then be presented with your secure DNS resolvers for the specific device as well as a Resolver ID.
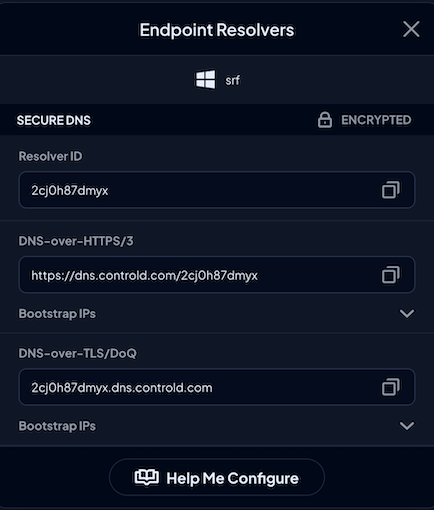
While you can manually change your DNS settings on the device, our GUI Setup Utility can fast-track the process with just a few clicks.
On the Endpoint Resolver screen, click Help Me Configure > Automatic Setup > Download Setup Utility.
This will download and install the GUI Setup Utility app onto your device, where you can paste the corresponding Resolver ID into the software.
Within seconds, the tool will do the hard work for you and configure your device’s DNS settings to reflect the Profile you’ve assigned it to - it really is as easy as that.
Understandably, doing this for hundreds or even thousands of Endpoints can be incredibly time-consuming. Don’t worry; we’ve solved that problem for you as well.
Mass deployment to all Endpoints using an RMM/MDM tool
To create multiple Endpoints at once, you can use the RMM/MDM provisioning feature. This allows for bulk configuration on Windows, Mac, or Linux devices. Here's a brief overview:
First, go to the Provision section in your Control D web panel.
Then, create a Provisioning code by filling out the required form.
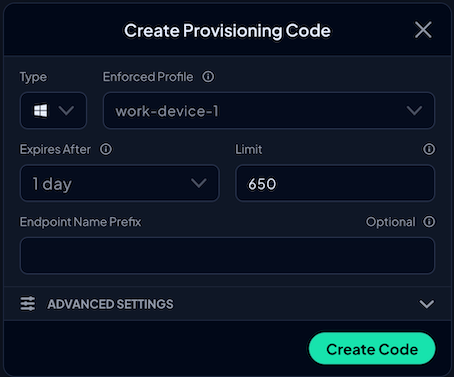
Finally, use the provided installation script to deploy Control D on multiple devices via your RMM/MDM platform.
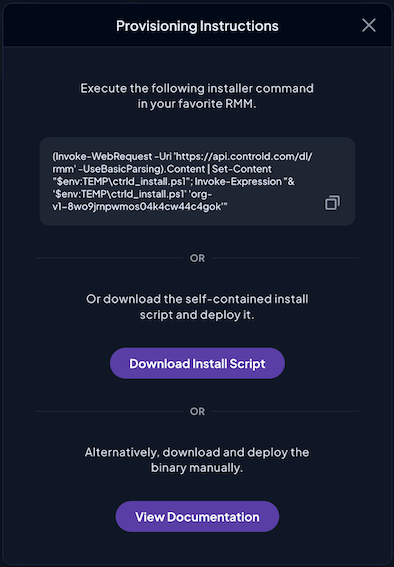
Just like that, you have now successfully deployed Control D at scale to each and every device in your business. From here, you’re officially ready to browse the internet in peace, knowing you are fully protected.
It should be noted that if you have multiple operating systems in your device fleet, you’ll have to create a separate provision code for each one - but the installation steps will be the same.
For detailed instructions, check out the Provisioning guide.
4. Add your Sub-Organization(s) – Optional
Sub-Organizations are great for distinguishing between different departments, companies, and clients. While creating Sub-Organizations isn’t necessary, each will likely require different DNS settings and configurations, and thus, separating them can make them easier to manage. This can be done by utilizing Global Profiles.
A Global Profile – which you can choose when creating a Sub-Organization – is the overarching Profile that is applied to all users and devices within a Sub-Organization. This means that upon joining, all users' DNS settings will be automatically configured according to that Profile’s rules.
However, users within a Sub-Organization aren’t just limited to the Global Profile’s policies; they can also create their own.
In such an event, the user will be held to both the Global Profile’s rules as standard and their own Profile’s rules, ensuring they can customize their device’s protection to their liking.
On a macro-level, Sub-Organizations also allow you to monitor the number of users, routers, and Profiles in each one and their separate usage statistics, which can then be used to tailor their configurations to their specific needs.
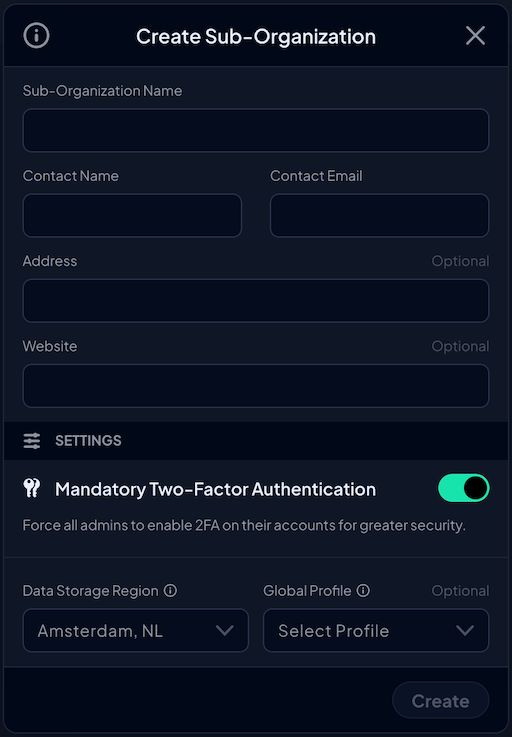
To add a Sub-Organization, simply navigate to the Sub-Organization tab and click the green + icon. Enter the Sub-Organization name, contact name, contact email address, and the relevant Global Profile (optional) you want it to be associated with, then click ‘Create.’
Final Thoughts
As you’ve just seen, anyone can complete the entire process, regardless of their tech expertise.
Whether you’re a novice or an experienced engineer, Control D can be as simple or complex to install and configure as you desire - much like using the service itself.
For those who want a more technical overview of the process, we have documentation that explains each step and feature in thorough detail.

