How to Restrict Internet Access (Block Content): Step-by-Step Guide
Learn how to restrict internet access on any network. Compare tools, see pros & cons, and block content fast with this Control D guide.

Parents, teachers, and IT teams all ask the same question: “How do I restrict internet access without breaking everything else?”
Maybe you want to keep kids safe online, stop employees from scrolling social media, or save bandwidth in a small office. Whatever the reason, blocking the wrong pages, and only the wrong pages, can feel hard.
The good news? It’s not, and you don’t need expensive hardware or deep networking skills.
In this guide, you’ll learn how to restrict access with the least amount of effort, and the pros and cons of all methods so you can decide which is best for you. Let’s dive in.
Why Restrict Internet Access?
There are several good reasons to enforce internet controls. Blocking specific websites or services lets you:
- Protect kids and students from violent or adult content
- Control internet usage and screen time
- Boost workplace focus by limiting social media or distractions during work hours
- Guard against malware sites and other online security threats
- Protect company data by blocking risky sites and preventing unauthorized access to sensitive information
- Save bandwidth for critical work or learning activities
- Meet compliance rules like CIPA (schools) or HIPAA (healthcare)
- Foster digital well-being with a safe and productive internet experience
Methods to Restrict Internet Access (and When to Use Them)
| Method | Skill Needed | Device Coverage | Pros | Cons |
|---|---|---|---|---|
| DNS filtering ⭐ Best Overall | 🟢 Low | Network-wide or per device | Blocks threats before they load, Central management, Detailed analytics and reporting, Set schedules & time limits, No extra hardware needed | Needs account setup |
| Router-level blocking | 🟢 Low | Network-wide | Quick setup | Limited categories, per-user rules are clunky, often slow and unreliable |
| Built-in OS controls (Windows Family Safety, Screen Time) | 🟢 Low | One device at a time | Free, detailed reports | Must repeat per device, gaps on shared devices |
| Browser add-ons | 🟢 Low | Single browser | Easy for DIY users | Easy to remove or bypass with a different browser |
| Firewall rules | 🟠 Med–High | Network-wide | Port-level precision | Steep learning curve, hardware or license costs |
| Full SASE / proxy | 🔴 High | Users worldwide | Identity-aware, secure | Enterprise price |
There are several ways to limit, control, and block internet access. Each method has its own benefits and drawbacks, but DNS filtering stands out as the most effective solution for both businesses and personal users.
It's fast, reliable, and works across all devices without slowing them down.
Bottom line: Start with DNS filtering for the 95% of scenarios where you need strong protection and simple management. It lets you block access to all types of content on the internet. Keep the other tools in your toolbox for edge cases and layer them as needed, rather than replacing a solid DNS foundation.
The Best Method to Restrict Internet Access: DNS Filtering
When your device wants to visit a website, it first asks the Domain Name System (DNS) for the website’s IP address. DNS filtering can say 'that site is blocked' instead of giving the IP address.
Think of DNS filtering as a gated checkpoint that sits in front of every website, app, game, and cloud service your users try to reach. If it doesn’t pass your policy rules, the request is never allowed to leave the network, resulting in no page load, no malware download, and no wasted bandwidth.
Here's why DNS filtering is the best method to limit internet access:
- Network-wide protection: Can be deployed on most modern routers, protecting all connected devices
- Fast performance: Keeps your internet speed fast
- Comprehensive blocking: Can block millions of harmful sites automatically
- Easy management: Simple dashboard to control all settings
- Works everywhere: When deployed on laptops or mobile devices, it protects them even off-network
- Advanced features: Time-based rules, user profiles, and detailed reporting
Why Choose Control D to Restrict Internet Access?
Control D is a powerful DNS filtering service that makes restricting internet access simple and easy. It hits the sweet spot: simple enough for home users, powerful enough for businesses.
- Best-in-Class Malware Protection – Independently tested with a 99.98% malware block rate, preventing access to malicious websites
- 20 native Filter categories plus popular third-party lists
- Over 1,000 individually blockable Services (Facebook, TikTok, Steam, etc.)
- Works on your whole network or single devices – no software to install
- Multi-Tenancy – manage different teams, departments, and clients from a centralized dashboard
- Powerful Analytics – get actionable insights with real-time statistics and customizable reports
- One-click schedules for different policies for different times of the day
- Different rules for different people – set stricter rules for certain teams, kids, or users, while creating relaxed rules for others
- Change Your Location – the Traffic Redirection feature spoofs your IP address, making websites think you're browsing from a different location
- Geo-Custom Rules – decide how each domain resolves to and from different regions to block, allow, or redirect content exactly where you need
Because Control D works at the DNS layer, it blocks bad websites before they can load on any of your devices.
How to Restrict Internet Access with Control D (Step-by-Step)
Follow these simple steps to start controlling internet access on your network.
✅ Step 1. Sign Up for Control D
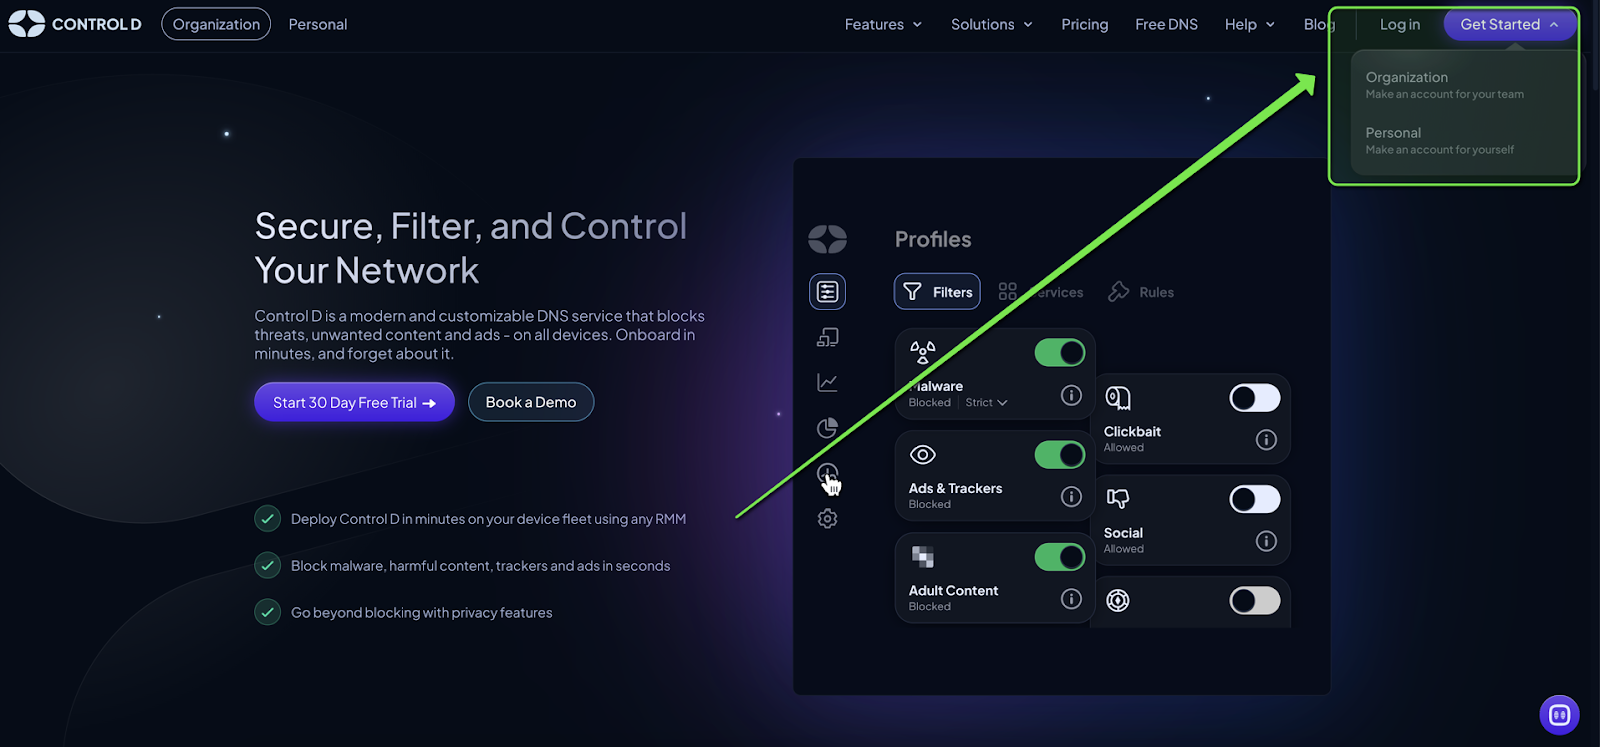
Visit Control D and create an account. You can start a free trial for 30 days (no credit card needed).
✅ Step 2. Create a Profile
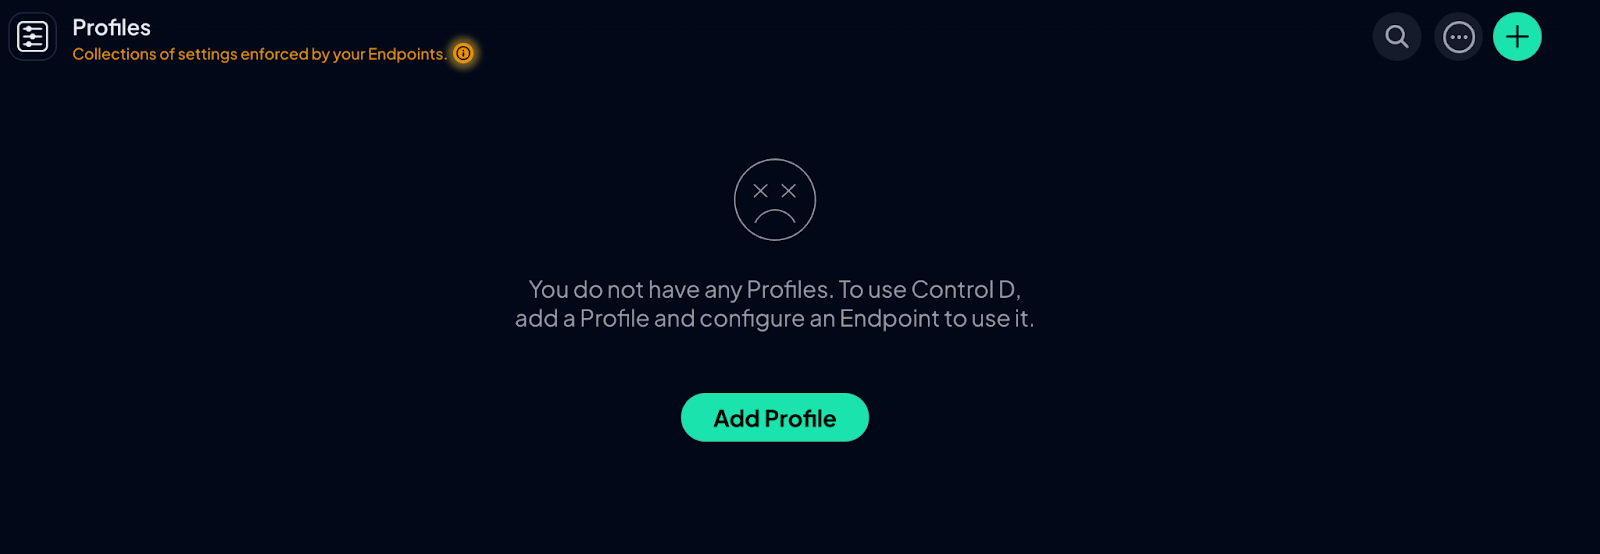
A Profile is a collection of filtering rules. You can have one for different locations, networks, or users. For this example, let’s just create one for your workplace network.
- Click Add Profile
- Give it a clear name, e.g., “Company-wide Protection” or “Workplace Network”
- Click Create
✅ Step 3. Customize Your Profile
Filters
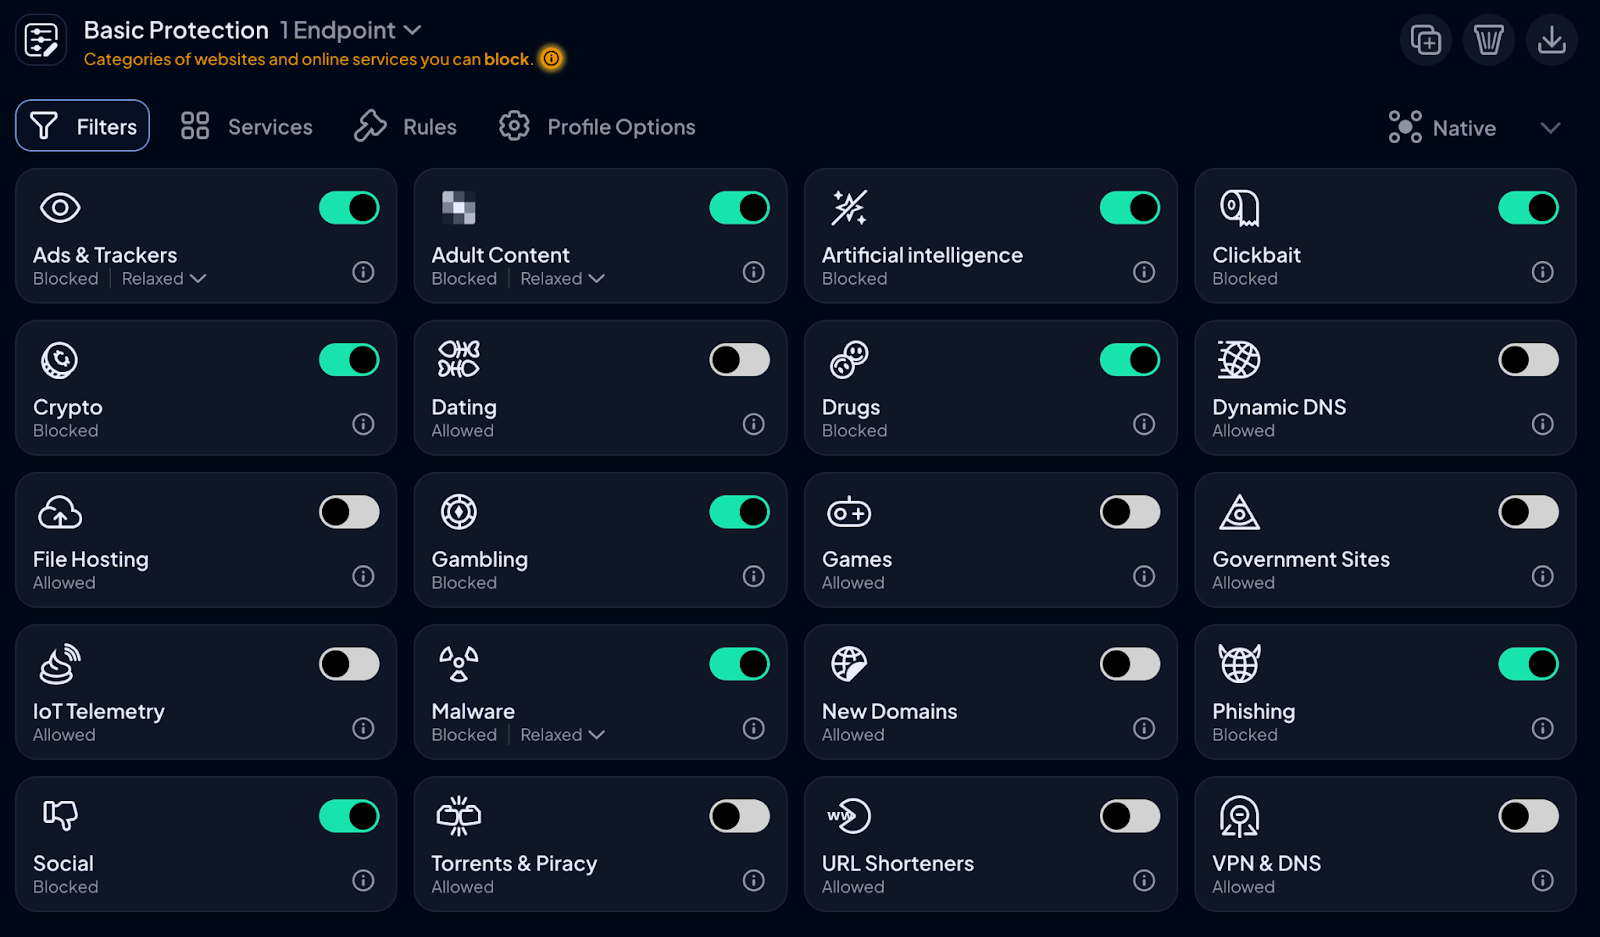
Filters are pre-made categories, like Adult Content, Gambling, Malware, Phishing, etc., that are updated in real time. This is useful if you want to block an entire category of content in one fell swoop, without having to constantly manage manual blocklists.
- Open the Filters tab.
- Toggle categories to Block. Popular picks:
- Ads & Trackers
- Adult Content
- Social Media
- Malware & Phishing
- New Domains
You don’t have to get it perfect the first time around. Simply block the most relevant Filters for your needs right now. You can always come back and change them at any time.
Services

Services are individual apps, tools, vendors, platforms, or specific websites. There are 1,000 Services to choose from, allowing you to fine-tune your filtering policies exactly to your liking. These can be blocked, bypassed, or redirected.
For example, you set a block rule for all Social platforms in the Filters tab, but want to allow access to Instagram. It’s as easy as navigating to the Services tab, searching Instagram, and toggling a bypass rule. This will block all social platforms except Instagram.
✅ Step 4: Bind Your Profile to the Network with an Endpoint
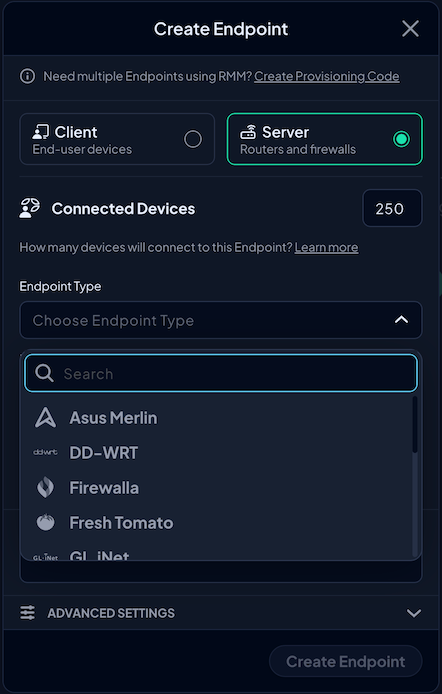
Now that your filtering rules are ready, you need to create an Endpoint to enforce them on.
- Go to Endpoints → Add Endpoint.
- Choose Server (ideal for a home, office, or classroom LAN).
- Label it something obvious, such as “Office Network”
- Pick the Profile you just built from the dropdown.
- Click Create
Control D instantly creates dedicated DNS resolver addresses for that Endpoint, ensuring every device on the network inherits your filtering policy.
Step 4.5: Create Time-Based Rules & Multiple Enforced Profiles (Advanced)
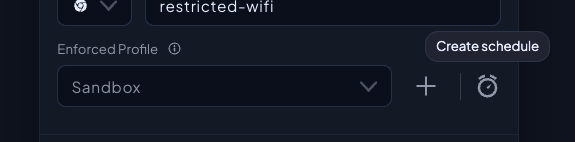
When creating an Endpoint and assigning a Profile, you can implement time-based rules that automatically get enforced depending on your preferred schedule.
- Click Create Schedule.
- Select the days and times you want to enforce that Profile
- Click Save Schedule
There’s also the ability to assign more than one Profile to your Endpoint, called Multiple Enforced Profiles. These can run at the same time, or have their own schedule. However, for the sake of this tutorial, we won’t go into detail since this is a slightly advanced feature.
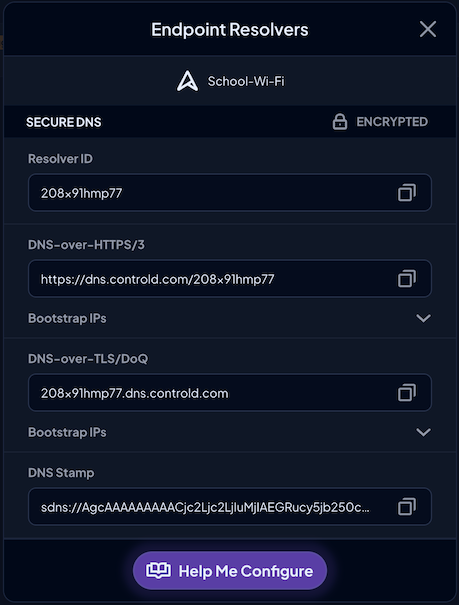
✅ Step 5: Point Your Router to Control D
- Sign in to your router or firewall’s settings page.
- Look for a menu called DNS (it’s usually under Network, Internet, or WAN).
- Erase the old DNS addresses and paste the Control D addresses you got in Step 4.
- Click Save and reboot the router if it tells you to.
Just like that, every device on your network – phones, tablets, smart TVs, and computers – will follow your Control D Profile rules automatically.
✅ Step 6: Review and Monitor
- Open the Analytics tab in the Control D dashboard.
- See what’s blocked. Make sure your Filters and Services are working as they should.
- Read the logs. The list shows every website request and tells you if it was allowed or blocked.
- Watch for sneaky workarounds. Look for signs that someone tried a different DNS or fired up a VPN.
- Tweak your Profile(s). If anything slips through (or you’re blocking too much), change your filtering policies.
Final Thoughts
Learning how to restrict internet access doesn’t have to be complicated or expensive. With the right approach, you can create a safer, more productive online environment for your business, school, or family.
DNS filtering with Control D makes it easy, giving you the most control and flexibility, without the heavy hardware or costs. In as little as ten minutes, you can block harmful or distracting sites, protect your users, and keep your network running smoothly

Frequently Asked Questions (FAQs)
1. What's the easiest way to restrict internet access at home?
DNS filtering is the easiest way to control internet usage. It works on all devices and takes just 10 minutes to set up.
2. Can I restrict internet access without buying hardware?
Yes, DNS filtering services like Control D let you manage internet access without any hardware. Just change your router's DNS settings for a safer online environment.
3. How do I restrict internet access for specific times?
Use DNS filtering with scheduling features. Control D lets you restrict internet access during work/school hours and apply relaxed policies in the evenings and weekends.
4. Can I restrict internet access on just one device?
Yes, you can restrict internet access per device by setting DNS on individual devices and creating device-specific profiles in Control D.
5. Will DNS filtering slow down my internet?
No, DNS filtering typically speeds up browsing by blocking ads and tracking scripts that slow down page loading.